What have you done to your square lately??

Disclaimer: Links on this page pointing to Amazon, eBay and other sites may include affiliate code. If you click them and make a purchase, we may earn a small commission.

JamesSam

Full Access Member
Joined
Feb 15, 2023
Posts
1,782
Reaction score
4,854
Location
VA
First Name
Sam
Truck Year
1987
Truck Model
Silverado V10
Engine Size
5.7 L 350 v8
I have this sitting around from a while back when I thought I was going to crawl under the truck and spray all the metal I could find with and then ultimately decided against it. Trying to utilize this I already have and spare some expense, I was thinking I could paint the new tank with it.
Is this a good seal for the tank, or should I use something different?
You must be registered for see images attach
 

JamesSam

Full Access Member
Joined
Feb 15, 2023
Posts
1,782
Reaction score
4,854
Location
VA
First Name
Sam
Truck Year
1987
Truck Model
Silverado V10
Engine Size
5.7 L 350 v8
@Ricko1966 , @Strick
Rick and Harold, I am not removing the bed when I drop the drivers tank on my 87 V10. Where is the eyelet ground attached from the sender? In some of your previous photos Harold, I think I saw the ground eyelet attached to the cross member that the fuel lines run through.
Also I have seen the eyelet from the filler neck hanging loose under my bed. Where does the eyelet ground from the filler neck attach?
 

Tank6x2

Supporting Member
Supporting Member
Joined
Mar 27, 2017
Posts
883
Reaction score
834
Location
Edmonton Alberta Canada
First Name
Kurt
Truck Year
79/86
Truck Model
C30
Engine Size
350, TH400.4:10 gears 2WD
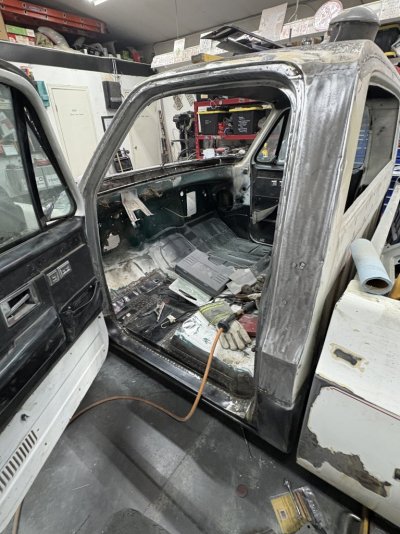
Think I may of Killed the old 90° die grinder with 2” pads cleaning the door jam/ b pillar, just trying to push through the lack of motivation this weekend.
 

Attachments

  • IMG_2700.jpeg
    IMG_2700.jpeg
    187.2 KB · Views: 9

Chris64

Full Access Member
Joined
Sep 16, 2024
Posts
105
Reaction score
151
Location
San Diego
First Name
Chris
Truck Year
1974
Truck Model
K20
Engine Size
350
Oh let's see...
* Finally got my timing about right.
* It finally starts and runs great...and...
* Starter stopped working - tapped it with a hammer and it works again. That may be on the menu to fix soon.
* Drove it around with the parking brake on. SOOO, Finally installed the parking brake release lever so I wouldn't keep forgetting.
* swapped my slider window with a solid window. That was a chore. I'll have to redo it once I get ready for paint.
* fixed roll up windows. Both windows now roll up and down smooth.
* Installed dumbo mirrors (although I intend to install new doors - I figured it would be nice to give it tryout position).
* Now that it had a sealed rear window, I gave it it's first wash. It still leaks on every other window though :hahano:

So much more to do but just ran out of weekend.
You must be registered for see images attach
 

Sgt Gus

Full Access Member
Joined
Aug 2, 2023
Posts
425
Reaction score
706
Location
Texas
First Name
Mark
Truck Year
87
Truck Model
R20 3/4 ton
Engine Size
454ci/7.4L
I have never removed a catalytic converter. My trucks cat is mid frame drivers side. It is directly after each pipe from the exhaust manifolds join to feed in to it and then after the cat the pipe Y's out to each side exit at the end of the bed. The cat is joined in between both sets of pipe by the u bolts you can see in the pic. My first thought process is to undo the nuts on the u bolts on both sides of the cat , then try to gently knock the cat loose, back and forth shove until I can pull it down from entrance and exit pipes.
What can I expect here? Should this go as I am imagining or will it be more difficult? Will I have to remove more of the exhaust? I am planning to disconnect the battery. Will I have dash codes after re-connect? Anyone with a similar cat experience please chime in.
You must be registered for see images attach

Reminder that I am removing the cat to get access to drivers gas tank brackets and while I have the cat out, if it is not completely destroyed inside, I want to soak it in dish soap overnight to unclog while I drop the old tank and paint the new tank.
Crap your CAT is in the way of the front bracket. Mine is not. I be no help. You can try. If no open gas neck etc I use met gas torch on nuts after PB. May break or have to cut. Someone will chime in after morning coffee I bet.
 

Ajax19

Full Access Member
Joined
May 11, 2022
Posts
350
Reaction score
1,334
Location
Socal
First Name
Ajax
Truck Year
1983
Truck Model
K3500
Engine Size
454
Fought the old bolts for a bit then test fit one side still gotta drill the holes in the bumper to 5/8" but I'm liking the look so far
You must be registered for see images attach
 

Snoots

Full Access Member
Joined
Jan 23, 2013
Posts
9,037
Reaction score
19,347
Location
Georgia
First Name
Roger
Truck Year
1973
Truck Model
Jimmy Sierra
Engine Size
350 w/203
I just removed the pos edelbrock carb and it looks like i won't need the adapter for the quadrajet like I thought I would. It looks like a spread bore intake is already on it. Right?
You must be registered for see images attach


The quadrajet should bolt right up I'm thinking. Or would it hurt to use the adapter plate?
You must be registered for see images attach
IMHO, that adapter looks a little restrictive. And it looks to be made of aluminum.
IIWM, I'd sell it and buy a thick fiber plate that won't transfer heat and alllow better flow.
Just my 2 cents.
 

82sbshortbed

Fuckemall!!
Joined
Mar 1, 2018
Posts
16,167
Reaction score
54,500
Location
SE Texas
First Name
Doug
Truck Year
1982, 1984
Truck Model
1500 shortbed, 1500 longbed
Engine Size
454, 305
IMHO, that adapter looks a little restrictive. And it looks to be made of aluminum.
IIWM, I'd sell it and buy a thick fiber plate that won't transfer heat and alllow better flow.
Just my 2 cents.
Yes, because it's an adapter for a spread bore to square bore. I've ordered a spread bore yo spread bore spacer since the intake is a spread bore. That pos edelbrock carb is a square bore. I think that's why it ran bad because they put a square bore on a spread bore plus the back barrel flaps weren't even working. I hate edelbrock carbs. Lol


Drauka99

Full Access Member
Joined
Apr 24, 2023
Posts
110
Reaction score
348
Location
Northwest Florida, USA
First Name
David
Truck Year
1981
Truck Model
C-10
Engine Size
6.0 LQ4
I have this sitting around from a while back when I thought I was going to crawl under the truck and spray all the metal I could find with and then ultimately decided against it. Trying to utilize this I already have and spare some expense, I was thinking I could paint the new tank with it.
Is this a good seal for the tank, or should I use something different?
You must be registered for see images attach
pretty sure that's what I used. 1 can did the tank (i think) and then used a second to get all the frame and cab that the tank will hide.
 

Chevrolado

Full Access Member
Joined
Dec 13, 2012
Posts
518
Reaction score
492
Location
McKinney, TX
First Name
Dave
Truck Year
1977/2006
Truck Model
K10/1500
Engine Size
350
New tanks? 16 or 20's. Metal or poly?
Yeah, ordered two new Spectra Premium 16gal tanks for my K10.
 

Sgt Gus

Full Access Member
Joined
Aug 2, 2023
Posts
425
Reaction score
706
Location
Texas
First Name
Mark
Truck Year
87
Truck Model
R20 3/4 ton
Engine Size
454ci/7.4L
Yeah, ordered two new Spectra Premium 16gal tanks for my K10.
Shinny and new. Hope drivers doesn't have a CAT in front of the bracket like @JamesSam .
 

mcarlo86

Full Access Member
Joined
May 17, 2019
Posts
599
Reaction score
1,137
Location
ND
First Name
Brian
Truck Year
1990
Truck Model
Suburban
Engine Size
350
Oh let's see...
* Finally got my timing about right.
* It finally starts and runs great...and...
* Starter stopped working - tapped it with a hammer and it works again. That may be on the menu to fix soon.
* Drove it around with the parking brake on. SOOO, Finally installed the parking brake release lever so I wouldn't keep forgetting.
* swapped my slider window with a solid window. That was a chore. I'll have to redo it once I get ready for paint.
* fixed roll up windows. Both windows now roll up and down smooth.
* Installed dumbo mirrors (although I intend to install new doors - I figured it would be nice to give it tryout position).
* Now that it had a sealed rear window, I gave it it's first wash. It still leaks on every other window though :hahano:

So much more to do but just ran out of weekend.
You must be registered for see images attach
Sweet wheels!
 

Grit dog

Full Access Member
Joined
May 18, 2020
Posts
7,344
Reaction score
13,056
Location
Auburn, Washington
First Name
Todd
Truck Year
1986, 1977
Truck Model
K20, C10
Engine Size
454, 350
@Ricko1966 , @Strick
Rick and Harold, I am not removing the bed when I drop the drivers tank on my 87 V10. Where is the eyelet ground attached from the sender? In some of your previous photos Harold, I think I saw the ground eyelet attached to the cross member that the fuel lines run through.
Also I have seen the eyelet from the filler neck hanging loose under my bed. Where does the eyelet ground from the filler neck attach?
Ground for the sender is attached to the frame or crossmember right close to the sender. You can see it.
Personally for coating the tank I wouldn’t use anything that comes out of a spray can. But that’s just me. Although that stuff looks like it would be good over a good coat of paint.
Again, remember, all this worry about gas tanks, what we find is a 35-50 year old gas tank that lasted 34-49 years and are somehow worried a new one, installed in a vehicle that will most likely be taken much better care of than originally, is going to rust or rot out again.
Seems like a problem that doesn’t need to be worried about for another 34-49 years. Worst case….
 

Forum statistics

Threads
44,744
Posts
966,934
Members
37,447
Latest member
sdboy
Top