Studying the schematic

Disclaimer: Links on this page pointing to Amazon, eBay and other sites may include affiliate code. If you click them and make a purchase, we may earn a small commission.

Raider L

Full Access Member
Joined
Sep 1, 2020
Posts
1,892
Reaction score
1,001
Location
Shreveport, LA
First Name
William
Truck Year
1974
Truck Model
C10
Engine Size
355
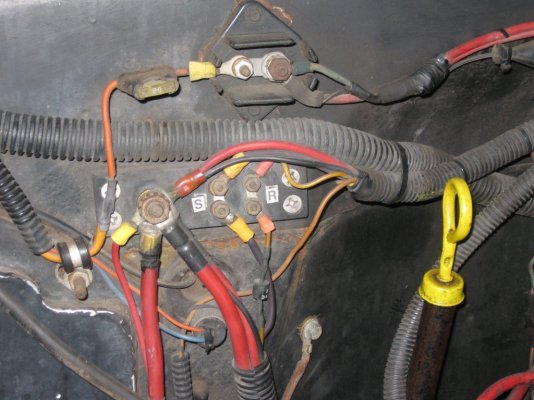
Since I've been messing with the wiring for various and sundri electrical jobs on my truck, I've had to do a lot of studying of the schematic on the truck, a lot. I was studying the schematic tonight and I made a startling discovery. I've got something very wrong with my primary wiring in the engine compartment. Something I know here lately I've looked right at dozens of times in the past weeks working on the Amp gauge install and didn't even catch it once. Had I, I would have corrected it and showed ya'll what yours should look like, and heck who knows, I might be the only one since I've made so many changes to the electrical system to my truck. @Ellie Niner, let's see if you can tell, "What's wrong with this picture?"
 
Last edited:

Raider L

Full Access Member
Joined
Sep 1, 2020
Posts
1,892
Reaction score
1,001
Location
Shreveport, LA
First Name
William
Truck Year
1974
Truck Model
C10
Engine Size
355
@Ellie Niner, here's the "picture". Look closely at the "junction block" and, I don't want to give it away, but you can look at the wires below the junction block, on that wiring block I made below it, kinda take all that in and let's see if you can figure out what's wrong. Tell me if you see what you need to see that's bad.
This is the unmodified condition of everything before I started changing some stuff up to properly install the Amp gauge wiring, so this would be the "virgin" appearance you'd need to see it in.
Look at the junction block. You can ignore the wire on the left on the junction block because it's the blower fan wire. That's kinda of a hint. I can't tell you anymore.
 

Attachments

  • Amp meter install 013.jpg
    Amp meter install 013.jpg
    150.1 KB · Views: 145
Last edited:

Ellie Niner

Full Access Member
Joined
Aug 7, 2021
Posts
382
Reaction score
615
Location
Tucson, AZ
First Name
Tory
Truck Year
1986
Truck Model
K10 Silverado
Engine Size
LE9 305
I'm gonna be honest and say that I'm not 100% sure. I guessed that that wire with the 20amp fuse goes to the high speed heater blower relay, as that's where mine is. That circuit up there *may* bypass the ammeter? Is that wire feeding the upper terminal block actually the output from your alternator? I'd need to see where each one of those wires in the photo terminates to come up with a definite answer... I know you explained it a couple weeks ago and I think I was following, but your wiring deviates enough from stock that I need a refresher. I do like how you've made your terminations and labeled things, though. Looks well organized and professional.
 

SquareRoot

Full Access Member
Joined
Mar 18, 2017
Posts
4,192
Reaction score
8,030
Location
Arizona
First Name
Mike
Truck Year
85
Truck Model
K20
Engine Size
350
Amp meters are a fire hazard and that's why OEM's stopped using them decades ago? That's my guess.
 

Snoots

Full Access Member
Joined
Jan 23, 2013
Posts
8,750
Reaction score
18,193
Location
Georgia
First Name
Roger
Truck Year
1973
Truck Model
Jimmy Sierra
Engine Size
350 w/203
Amp meters are a fire hazard and that's why OEM's stopped using them decades ago? That's my guess.
Yes! I had mine go up in a PUFF of smoke on 2 vehicles. NOT FUN!! I went to the boneyard and found a Voltmeter, removed the 'drain' side wire and installed a ground. I used the 'feed' side wire for the positive and took it to a 'switched' power outlet at the fuse box.
I didn't concern myself with the circuit board on the back of the instrument cluster since the wires were gone.
The new meter fit like a glove.
 

SirRobyn0

Full Access Member
Joined
Dec 6, 2019
Posts
6,755
Reaction score
11,402
Location
In the woods in Western Washington
First Name
Rob
Truck Year
1984
Truck Model
C20
Engine Size
305
I've done lots of electrical work on older vehicles, and I know how to do it right. Even still I don't see it either. I might if I looked at the diagram, but I'll be honest I can read wiring diagrams just fine but hate doing it. Just not fun.

I agree with the Amp meter comments. Amp meters are great to know exactly what is going in and out of the battery and when. I understand why William wants one. Most are also rated pretty low not usually for more than 60 amps. All that current must run though the amp meter and adds length to the charging wiring and therefore increases resistance. The thing is if a guy sticks a high performance alternator in one of these trucks like and 90 amper, and then runs the battery down there is a risk of blowing the amp meter or worse during the charging cycle, because the alternator now produces more current than the amp meter is designed to handle. Again I understand why someone would want one, but the volt meter, while arguably a less immediate way to see what is going on with the charging / battery system is a safer more reliable system.
 

Scott91370

Full Access Member
Joined
Apr 2, 2018
Posts
997
Reaction score
1,019
Location
Burleson, Tx
First Name
Scott
Truck Year
1985
Truck Model
Sierra1500
Engine Size
350
I don't know what the entire thing circled is but I think the one red wire should go up to the connector (following my arrow).
You must be registered for see images attach
 

Raider L

Full Access Member
Joined
Sep 1, 2020
Posts
1,892
Reaction score
1,001
Location
Shreveport, LA
First Name
William
Truck Year
1974
Truck Model
C10
Engine Size
355
Wow, thanks everyone!!

Like I tried to indicate this is the "virgin" condition before I moved some wires around for the new Amp gauge rewire. Ya'll were hitting right around it, and yeah you'd need to look at the schematic to see how it's supposed to be. But, @Ellie Niner when we were laughing at how the factory had made that real nasty connection with the alternator wire? It is why I started taking a much closer look at what I did with the Amp gauge wiring last night when I found my...,well I can't say it's entirely my mistake, because I found another factory screw-up!
 
Last edited:

Raider L

Full Access Member
Joined
Sep 1, 2020
Posts
1,892
Reaction score
1,001
Location
Shreveport, LA
First Name
William
Truck Year
1974
Truck Model
C10
Engine Size
355
I'm including what I did to correct the wiring so I could safely wire the Amp gauge then you'll get to see what I found better.
You must be registered for see images attach
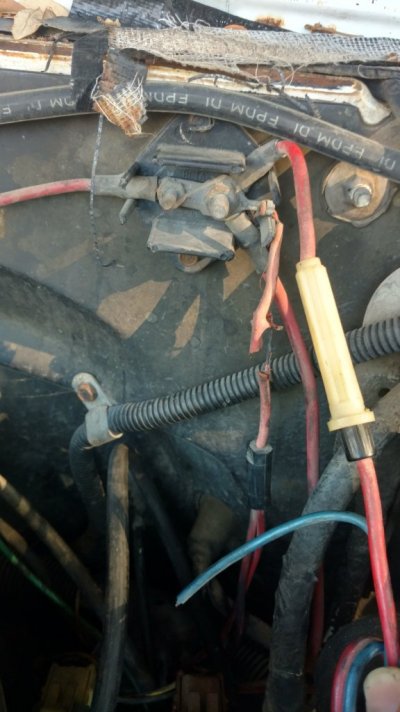
In the pic above, up on the junction box you'll see one #10 red wire, the one that's just below the #10 red wire with the ring terminal right now unattached, on it. That red wire is the original starter power wire that has been on this junction box since I bought the truck. But what I discovered is the factory put the junction box on backwards from how it's shown in the schematic. That was the first thing. The #10 red wire up there with the ring terminal on it is in the correct position to be installed except I'll have to flip the junction box if this wiring is going to be done right, and the fusible link to work like it's designed to work. So that's that.
You must be registered for see images attach
It's easier to show this in the pic above. The #10 wire that's curving at the bottom of the picture is the other end of that starter power wire. In the schematic that 1/4" stud, on the junction box above, is supposed to be on the other side, and the #10 screw, the little screw in the junction box is supposed to be on your right, so you can be correctly oriented. When the junction box is turned correctly that starter power wire will be on the other side, or on your left, of the junction box on the 1/4" stud. The black #10 wire, the second wire above that's on the 1/4" stud now will go with the starter power wire over to your left with the new location of the 1/4" stud.
That front wire, in the pic above is the Alternator power wire. When the junction block is turned over, it will go on the little #10 screw which will be on the right side of the junction box. Then there will be 12v power on both sides of the fusible link, 12v battery power going through the starter power wire on one side, and 12v Alt. power on the other side. And according to the schematic that's the correct way to wire it, 12v power on both sides of the fusible link.

If it blows, once fixed in it's new configuration, the battery will eventually die because the Alt. would have stopped charging. Your volt meter in the cab would show no charge and would be indicating battery voltage only. If you had a amp meter it would peg to discharge.
The factory had it wrong. And I messed things up even more by doing something I'll explain in the next pic.
And the next pic I hope won't be to confusing.
You must be registered for see images attach
This is the way the wires are currently. Let's take this one area at a time and that will clear up any confusion. Look at the junction box only. That orange wire with the 20 amp fuse holder on it doesn't even belong there and I have no idea what or why I put it there!

And here's something for you all; There is no way the fusible link will ever work in it's current configuration! Unless the blower fan shorted out and jammed and there was some other kind of situation, that fusible link would never blow and the truck would probably burn, God forbid! So, it is going to be removed and is going back to where it's supposed to go back inside the cab with the other fan wiring. So on the junction box up there the red #10 wire in the back comes over to the left side, after I flip the box around and the 1/4" stud is on the left. And that #10 black wire up there also comes to the left side of the link as well. That will put power on one side of the fusible link. That black #10 wire is one side of the Amp gauge wiring and it's okay for it to be there with the starter power wire and as a matter of fact that's the way the Autometer instructions says it's to be.

Now let's move down to the block, below the junction box, that I made that has all the wiring on it. This is the simplest of all, it stays just like it is. And it is correctly wired for the Amp gauge. You'll see there are two #10 red wires just above the "S". One is the starter power wire in the back of those two, and the #10 red wire in front is the other wire that goes to the Amp gauge and it's just like the instruction say and it will stay right there.

So that's weird isn't it that that's two screw up's is on GM for something important for this truck to be worked on in the future. I'd tell you about the third screw up on GM where wiring is messed up but I'll hang onto that for some later date. I'll give you a hint, it involves the wiring junction block on the firewall down there where the wires go into the cab, and what happens when it goes inside to the fuse block! What I found is enough to cause you to have nightmares! Ha, ha, ha!
 
Last edited:

SquareRoot

Full Access Member
Joined
Mar 18, 2017
Posts
4,192
Reaction score
8,030
Location
Arizona
First Name
Mike
Truck Year
85
Truck Model
K20
Engine Size
350
What exactly do you keep calling the "fusible link"? Can you point it out or describe it in one of your photos? It looks like you spliced in a new piece of wire with a ring terminal on the end? Is this piece your link?

The orientation of the "junction block" doesn't change how the flow of electricity works in this case. Since its just a junction to allow those main wires to be disconnected when the cab/engine are separated. Here's a pic of a blown factory link.
 

Attachments

  • Linky.jpg
    Linky.jpg
    101.2 KB · Views: 138
Last edited:

Raider L

Full Access Member
Joined
Sep 1, 2020
Posts
1,892
Reaction score
1,001
Location
Shreveport, LA
First Name
William
Truck Year
1974
Truck Model
C10
Engine Size
355
@SquareRoot,

What the schematic is calling the "fusible link" is up on the junction block there is a thin plate thing that connects between the 1/4" screw and the #10 little screw. That thin "plate" connector, or some other description of it, is placed over the two screws. The ring terminals from various wires go on top of either one of those screws or the other. To my understanding that thin "plate" is supposed to melt if there is an overload.

What you are showing in your pic I've got that one, but mine is down near the starter and is attached to one of the solenoid screws down there. If my memory serves there are two down there on mine. And that also jives with what the schematic shows, except I think it only shows one, and that may very well be what I've got. I'll have to take another look at some other time. You know, memory problems. No big deal.

When I was rebuilding the truck there were all this big bunch of wires that went to the starter, like yours is. But in looking at all that wire, I mean it came across the right side of the engine next to the intake manifold running towards the front of the engine, then down the front of the engine, then it too a turn at the oil pan and ran along the oil pan, attached with plastic covered metal clips fastened to a couple of oil pan bolts, and then ended up at the starter!

I looked at that and thought, "Why did they do it like that? Look at all that wire! The starter is right there at the back of the engine there at the firewall, why don't I take all that wire off the engine and run it straight down from where it's at the fire wall and just go straight down to the starter. Wouldn't that be better?"

I cut out 5 ft. of excess wiring !! and since I wanted a way to remote crank the engine that's what led me to make that block I put on the firewall where you see all the wire. That wire is the same wire you have on your truck, just shorter. I cut the wires in half so that I could get to the wire that I could hook up the remote hand held start switch so I could do valve adjustments, and whatnot.
 

Raider L

Full Access Member
Joined
Sep 1, 2020
Posts
1,892
Reaction score
1,001
Location
Shreveport, LA
First Name
William
Truck Year
1974
Truck Model
C10
Engine Size
355
Hold your horses! Stop the presses!

You know what I realized today??!! The reason why some of these blower fan wires, relay wiring, fan speed switch wiring, resistor box wiring, and why that big orange wire is up there on the junction block, and why none of these wires seem to make sense as far as the color the schematic says they're supposed to be???

It dawned on me today why! My truck used to have A/C!! I kept wondering, "Why are these colors not what the schematic says they're supposed to be? What's going on here?" And then it hit me this afternoon, "Oh Man, this truck had air!!" No wonder none of the colors are what's on the schematic, which is for non A/C vehicles. Just general wiring, nothing specific

And what's worse, the junction block on the firewall is turned the right way for trucks WITH A/C. So, I'll still make the change to where the starter power wire is but it'll have to go over to the small #10 little screw and I won't be turning the junction block over after all.
 

Raider L

Full Access Member
Joined
Sep 1, 2020
Posts
1,892
Reaction score
1,001
Location
Shreveport, LA
First Name
William
Truck Year
1974
Truck Model
C10
Engine Size
355
@SquareRoot,

Did your truck ever have A/C? The one of the pic showing the fried wire? Because the junction block is turned like mine with the 1/4" screw on the right. I'm going strictly by the schematic that shows non A/C, the 1/4" screw on the left.

Does any of this make any difference? Probably not. It's just doing something.
Absolutely nothing will happen if I just left everything like it is. Heck, it's been that way in part since I bought the truck in 1981! It hasn't caused me one seconds problem in all this time. I'm just messing around for lack of anything else to do.
 

Raider L

Full Access Member
Joined
Sep 1, 2020
Posts
1,892
Reaction score
1,001
Location
Shreveport, LA
First Name
William
Truck Year
1974
Truck Model
C10
Engine Size
355
@Scott91370,

It's a block I made in order to split the starter wiring so I could use a hand held remote start switch so I could turn the engine over and adjust the lifters from time to time, and do other tuning and or whatever I may need to do with a remote start switch. Otherwise I would have to put my start switch clips down on the starter and crawl under the truck every time. I didn't want to do that and I'm disabled and it hurts to have to do that anyway. I'd rather stand up straight and do that than get down on the ground to do it.

It's made out of a piece of 3/8" phenolic material I got when I used to work on commercial aircraft. I drilled holes for the screws and the big bolt, then counter sunk the holes so the screws and bolt would have a shoulder to sit on, then inserted the screws and the 3/8" bolt from the back and then filled the holes in the back with JB Weld. The small screws I bridged with some link connectors I found. The screws and the 3/8" bolt are brass, like the starter screws and bolt is. I figured I'd use that to. I found out which one of the screws would be used for remote starting the truck and marked them with stickers from old vhs tape letter and number sheets I had stashed in my tool box. I mark my distributor cab with the numbers for firing sequence from those vhs sheets that used to come with every vhs tape so you could mark what the tape was about. I have a lot of them.

And that #10 red wire you have marked, IS up on the junction block. It's the red wire behind that light blue wire.
 

SquareRoot

Full Access Member
Joined
Mar 18, 2017
Posts
4,192
Reaction score
8,030
Location
Arizona
First Name
Mike
Truck Year
85
Truck Model
K20
Engine Size
350
I'm about 107% positive that junction block is just a junction block. Technically, it is a "bussbar". The metal strip is not any type of fusible link. The #10 wires on each side of it would melt way before that strip of metal would. I have 200 amp fuses in my truck protecting my amplifiers that are a tiny fraction the size of that metal strip. A fusible link will always be insulated to prevent fires is it burns. My guess is fusible links may connect to that junction block. My wiring diagram isn't exactly user friendly. It's accurate but hard to decipher details.

That pic I posted was not mine, it was off the net. My truck is way beyond stock and 99% of my wiring has been replaced and modernized. But, I know every wire, connector and device on it and have a logbook of each circuit.
 
Last edited:

Latest posts

Forum statistics

Threads
44,163
Posts
950,654
Members
36,276
Latest member
2manysquares2care
Top