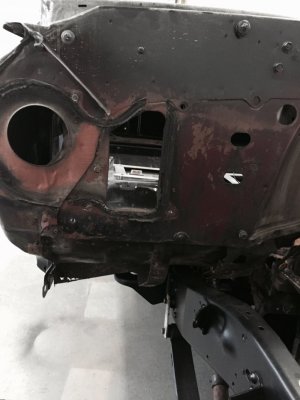
Thanks that's the kind of answer I was searching for. So, what I need to do is find a housing first and go from there
Yeah, get the evap/blower housing and the main (cabin side) air handling section and then start. The reason these are required is because they are needed to mark the locations of the through bolts used for an A/C system. When you have made the new bolt holes, you hang just the evap housing on the engine side.
There are 6 places where it is secured. Three are through bolts that penetrate from the inside (use regular bolts for the locating process) and three are big self tappers. Two of the self tappers are common to both heat-only and A/C systems the other is used only with A/C. Like this:
You must be registered for see images attach
You must be registered for see images attach
The first step is to mount evap to the FW using just the self tappers. As noted above two of the holes will already exist, drill the 3rd one and install a screw. These three screws will position the box correctly and allow you to accurately determine the proper positions of the 3 through bolt holes. I just leave the box bolted to the wall for drilling. Center punch the FW in the center of each hole in the evap box and drill for 5/16" bolts. The actual diameter of the through bolts is 1/4" but a 5/16" hole will allow for some minor adjustment without sloppiness.
Install a couple of temporary bolts in the thru bolt holes - they don't need nuts. The reason for this is explained further down.
With the evaporator housing now secured in it's correct and final position, you can begin to modify the firewall to the A/C design.
Go into the cab and get under the dash. Note the positions of the temporary bolts in the thru-bolt holes. The lower outboard one doesn't matter. Using the two inboard through bolts as a reference, mark a rectangle that is smaller than the dimension of the inlet to the cabin side of the air handler. Size it so that it is well away from the perimeter of the flange but still large enough for you to pass your hand through. Something like this:
You must be registered for see images attach
Go back out and remove the evaporator housing from the firewall.
Now you will do basically the same thing with the inside air handler as you did with the evap housing (i.e. temporarily secure it in the proper position). There are 4 places to hold it in place while you complete the next step. Use the 3 through bolts (with nuts as they would normally be for final installation) and way over on the outboard side there is a hole in the casing that accepts a big self tapper. This screw is common to both heat-only and A/C air handlers so the hole in the FW will already exist.
You must be registered for see images attach
When the air handler is securely in place, it is time to mark the firewall for the final dimension and location of the opening.
Get out of the cab, and from the engine side of the FW, reach in with a grease pencil (or Sharpie, metal marker, etc.) and make a nice clean mark on the cab side of the FW. Trace around the inside of the lip that extends out from the air handler flange. After you get one side marked, you will have to move the blend door damper over to it's other limit to mark the opposite edges.
That's basically it. Remove the air handler and - while working from inside - remove the excess steel that remains (between your rough opening and the final tracing). If you want the lip around the blend door opening to extend through the firewall, you will have grind an extra 1/8" or so out from your trace mark. That's because when you marked it, you traced around the inside of it.
You should end up with an opening in the firewall that pretty much exactly replicates a factory opening. The only difference is that yours won't have that 1/4" turned back lip that the factory opening does - and the corners will be sharp instead of rounded.
After the opening is done to your satisfaction, I strongly suggest that you remount the air handler. When it is in place, manually move the blend door and note whether there is any binding and that is can be fully stroked from limit to limit. The first A/C modification I did, I neglected to check this. Only after everything was finally assembled did I notice that the damper would stick in certain spots and suddenly pop free - it stayed that way.
I wrote this from memory and rather quickly, so it could have many mistakes and/or omissions. If you need more info, come back.


