Another a/c firewall

Disclaimer: Links on this page pointing to Amazon, eBay and other sites may include affiliate code. If you click them and make a purchase, we may earn a small commission.

lsjunkie

Junior Member
Joined
Jul 31, 2015
Posts
2
Reaction score
0
Location
WV
First Name
Mike
Truck Year
1982
Truck Model
K10
Engine Size
5.3
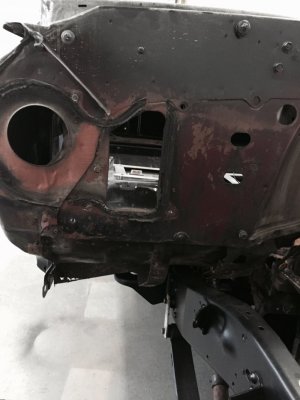
I have an 82 k10 that does not have factory a/c. I don't want the vintage air unit so that is out of the question. I've seen several pictures of the rectangle hole that needs to be cut out of the firewall but I have yet to find any actual dimensions. I do not have the evap or motor housing at this time or I would line it up and go from there.

So my question is, are there any measurements that you guys have so I can get the hole cut ?

I attached a picture of my firewall, let me know if it isn't viewable. Thanks
 

Attachments

  • image.jpg
    image.jpg
    89.1 KB · Views: 82

DoubleDingo

Full Access Member
Joined
Jul 3, 2012
Posts
11,255
Reaction score
17,197
Location
Right where I am
First Name
Bagoomba
Truck Year
1981
Truck Model
81-C20 Silverado Camper Special-TH400-4.10s
Engine Size
Carb'ed Vortec 350
I don't have any, but maybe someone with lots of knowledge of these trucks with factory a/c can chime in.
 

chengny

Full Access Member
Joined
Feb 22, 2012
Posts
4,086
Reaction score
1,023
Location
NH
First Name
Jerry
Truck Year
1986
Truck Model
K3500
Engine Size
350/5.7
I have never seen a dwg that gives the location/dimensions of the firewall opening required for an A/C installation. I wouldn't trust them if they did exist. There are too many variables - mainly from what points would the measurements be taken. The cut for the opening has to be nearly perfect. Too small and the blend door hangs up, too big and the evap housing doesn't seal.

I have tried (one time) making a template of the opening in a firewall with factory A/C. I made it out of stiff cardboard that was temporarily held in place with the evap box mounting screws. It was a a disaster. The FW is not flat in that area so the cardboard doesn't sit flat. The screw holes are so far apart that the pressure from the Sharpie caused the cardboard to flex while tracing the opening. The end result looked like something you'd see on the wall of a special-ed classroom. Didn't even try it.


I have developed my own method of locating the opening in pretty much the exact factory location and to the correct size.

I would describe it here, but it requires that you have the air handlers for both sides of the firewall.

After you've done it a couple of times it only takes about 2 hours (probably takes longer to explain it than do it) When complete it looks like this:

You must be registered for see images attach
 

lsjunkie

Junior Member
Joined
Jul 31, 2015
Posts
2
Reaction score
0
Location
WV
First Name
Mike
Truck Year
1982
Truck Model
K10
Engine Size
5.3
Thanks that's the kind of answer I was searching for. So, what I need to do is find a housing first and go from there
 

Georgeb

Full Access Member
Joined
Apr 30, 2015
Posts
3,259
Reaction score
214
Location
Wisconsin
First Name
George
Truck Year
2003
Truck Model
K10 Burb Z71
Engine Size
5.3
I need to do the same but go the opposite way. The problem is i dont want to take the other truck apart yet so I will need to get creative
 

1low4x4

Full Access Member
Joined
Feb 14, 2011
Posts
2,409
Reaction score
716
Location
Texas
First Name
Nick
Truck Year
1984
Truck Model
K10
Engine Size
5.7
here's a picture of my AC firewall. it's open currently right now if you want any measurements. I don't see why it has to be so precise, within a quarter inch would do fine I would think. then you could fine tune it to fit the units you get.


You must be registered for see images attach
 

1low4x4

Full Access Member
Joined
Feb 14, 2011
Posts
2,409
Reaction score
716
Location
Texas
First Name
Nick
Truck Year
1984
Truck Model
K10
Engine Size
5.7
here is the other firewall in my driveway. I think the evaporator housing would seal fine as long as you didn't cut the hole way too big.

You must be registered for see images attach
 

1low4x4

Full Access Member
Joined
Feb 14, 2011
Posts
2,409
Reaction score
716
Location
Texas
First Name
Nick
Truck Year
1984
Truck Model
K10
Engine Size
5.7
as for good places to measure from, if you want I will take the time and get some. Just take a level and from the right side of the blower motor circular hole pull a measurement 2v evaporator box hole, then from the bottom of the same circular heater blower hole, pull a measurement using a level for the top of the evap box hole in the bottom. Can do the same thing for the heater core holes if they aren't the same
 

1low4x4

Full Access Member
Joined
Feb 14, 2011
Posts
2,409
Reaction score
716
Location
Texas
First Name
Nick
Truck Year
1984
Truck Model
K10
Engine Size
5.7
a crappy drawing of what I'm talking about. This cab pictured is an 85 2 wheel drive, the other cab is an 82 4 wheel drive. But these evaporator boxes or mass produced, I will check the measurements tomorrow and if they are the same then you are good to go

You must be registered for see images attach
 

chengny

Full Access Member
Joined
Feb 22, 2012
Posts
4,086
Reaction score
1,023
Location
NH
First Name
Jerry
Truck Year
1986
Truck Model
K3500
Engine Size
350/5.7
Thanks that's the kind of answer I was searching for. So, what I need to do is find a housing first and go from there

Yeah, get the evap/blower housing and the main (cabin side) air handling section and then start. The reason these are required is because they are needed to mark the locations of the through bolts used for an A/C system. When you have made the new bolt holes, you hang just the evap housing on the engine side.

There are 6 places where it is secured. Three are through bolts that penetrate from the inside (use regular bolts for the locating process) and three are big self tappers. Two of the self tappers are common to both heat-only and A/C systems the other is used only with A/C. Like this:

You must be registered for see images attach


The first step is to mount evap to the FW using just the self tappers. As noted above two of the holes will already exist, drill the 3rd one and install a screw. These three screws will position the box correctly and allow you to accurately determine the proper positions of the 3 through bolt holes. I just leave the box bolted to the wall for drilling. Center punch the FW in the center of each hole in the evap box and drill for 5/16" bolts. The actual diameter of the through bolts is 1/4" but a 5/16" hole will allow for some minor adjustment without sloppiness.


Install a couple of temporary bolts in the thru bolt holes - they don't need nuts. The reason for this is explained further down.

With the evaporator housing now secured in it's correct and final position, you can begin to modify the firewall to the A/C design.

Go into the cab and get under the dash. Note the positions of the temporary bolts in the thru-bolt holes. The lower outboard one doesn't matter. Using the two inboard through bolts as a reference, mark a rectangle that is smaller than the dimension of the inlet to the cabin side of the air handler. Size it so that it is well away from the perimeter of the flange but still large enough for you to pass your hand through. Something like this:

You must be registered for see images attach


Go back out and remove the evaporator housing from the firewall.

Now you will do basically the same thing with the inside air handler as you did with the evap housing (i.e. temporarily secure it in the proper position). There are 4 places to hold it in place while you complete the next step. Use the 3 through bolts (with nuts as they would normally be for final installation) and way over on the outboard side there is a hole in the casing that accepts a big self tapper. This screw is common to both heat-only and A/C air handlers so the hole in the FW will already exist.

You must be registered for see images attach


When the air handler is securely in place, it is time to mark the firewall for the final dimension and location of the opening.

Get out of the cab, and from the engine side of the FW, reach in with a grease pencil (or Sharpie, metal marker, etc.) and make a nice clean mark on the cab side of the FW. Trace around the inside of the lip that extends out from the air handler flange. After you get one side marked, you will have to move the blend door damper over to it's other limit to mark the opposite edges.

That's basically it. Remove the air handler and - while working from inside - remove the excess steel that remains (between your rough opening and the final tracing). If you want the lip around the blend door opening to extend through the firewall, you will have grind an extra 1/8" or so out from your trace mark. That's because when you marked it, you traced around the inside of it.

You should end up with an opening in the firewall that pretty much exactly replicates a factory opening. The only difference is that yours won't have that 1/4" turned back lip that the factory opening does - and the corners will be sharp instead of rounded.

After the opening is done to your satisfaction, I strongly suggest that you remount the air handler. When it is in place, manually move the blend door and note whether there is any binding and that is can be fully stroked from limit to limit. The first A/C modification I did, I neglected to check this. Only after everything was finally assembled did I notice that the damper would stick in certain spots and suddenly pop free - it stayed that way.


I wrote this from memory and rather quickly, so it could have many mistakes and/or omissions. If you need more info, come back.
 

1low4x4

Full Access Member
Joined
Feb 14, 2011
Posts
2,409
Reaction score
716
Location
Texas
First Name
Nick
Truck Year
1984
Truck Model
K10
Engine Size
5.7
Chengny- what did you use to seal the evap housing back to the firewall. Rtv, duct seal etc?
 

chengny

Full Access Member
Joined
Feb 22, 2012
Posts
4,086
Reaction score
1,023
Location
NH
First Name
Jerry
Truck Year
1986
Truck Model
K3500
Engine Size
350/5.7
I use Frost King High Density Black Foam weather stripping. The 1/2" wide X 3/8" thick version works best. It can be shaped to the exact contours of the evap casing - or whatever else needs to be sealed - and the black HD stuff stays at full thickness.

You must be registered for see images attach


I don't trust the adhesive though. I used to just pull off the protective wax paper and stick it on. But the bond always seemed fail at some point during installation. I would end up with a section hanging down and have to pull the piece and start over.

To prevent that, I have started securing the foam rubber to whatever it is being applied to with spray adhesive (3M High Strength 90 Adhesive is good).


The sealant that was applied at the factory is called 3M Strip Calk (sic):

You must be registered for see images attach


It is just as effective but, wants to squeeze out sometimes and makes for a sloppy looking job.

I seal the gaps between the lines into and out of the casing with black RTV silicone:

You must be registered for see images attach
 

Latest posts

Forum statistics

Threads
44,178
Posts
950,965
Members
36,304
Latest member
Yoginess11
Top