What have you done to your square lately??

Disclaimer: Links on this page pointing to Amazon, eBay and other sites may include affiliate code. If you click them and make a purchase, we may earn a small commission.

WFarm

Full Access Member
Joined
Jan 11, 2023
Posts
284
Reaction score
1,765
Location
Central Virginia
First Name
Paul
Truck Year
1975, 1987
Truck Model
K5 Blazer, R1500
Engine Size
454, 350 tbi
Have h
Lube locker gasket if one is available. Have been very pleased with all of the ones I have used. Somewhere around 6 of them, and have two more to be installed. Rear ends and transmissions.
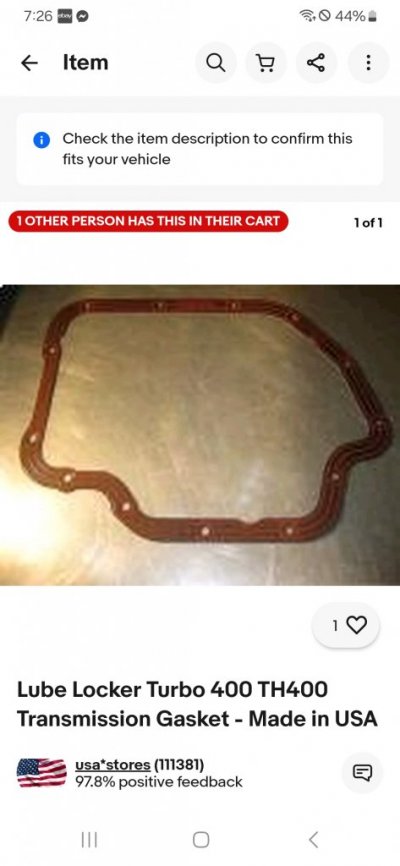
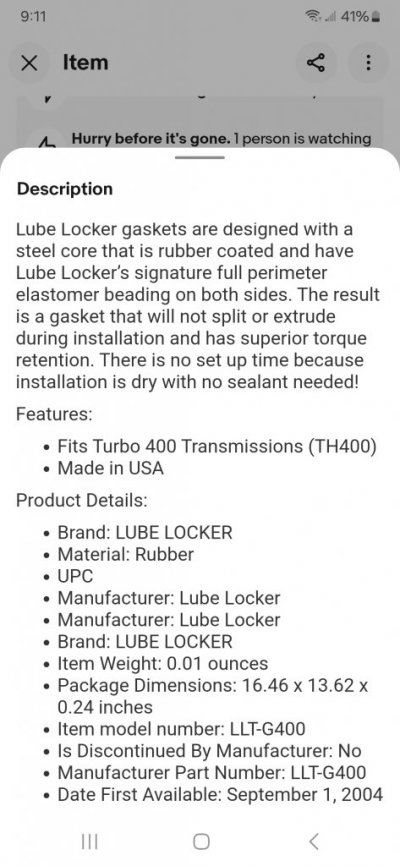
Great gaskets. Every day I look at the floor under my two trucks and every day the floor is dry. Plus you can reuse them if you need to drop the pan for something.
 

squaredeal91

Full Access Member
Joined
Mar 10, 2023
Posts
2,348
Reaction score
4,179
Location
Cave junction Oregon
First Name
Greg bush
Truck Year
1991 SB
Truck Model
K30
Engine Size
5.9 Cummins 12 valve
Lube locker gasket if one is available. Have been very pleased with all of the ones I have used. Somewhere around 6 of them, and have two more to be installed. Rear ends and transmissions.
Found one!
 

Attachments

  • Screenshot_20240917_072603_eBay.jpg
    Screenshot_20240917_072603_eBay.jpg
    57.7 KB · Views: 8

squaredeal91

Full Access Member
Joined
Mar 10, 2023
Posts
2,348
Reaction score
4,179
Location
Cave junction Oregon
First Name
Greg bush
Truck Year
1991 SB
Truck Model
K30
Engine Size
5.9 Cummins 12 valve
Nice! Are those similar to the Moroso silicone/steel core style?
Here's the description they give. It's not from there actual website.
 

Attachments

  • Screenshot_20240917_091113_eBay.jpg
    Screenshot_20240917_091113_eBay.jpg
    93.4 KB · Views: 8

WFarm

Full Access Member
Joined
Jan 11, 2023
Posts
284
Reaction score
1,765
Location
Central Virginia
First Name
Paul
Truck Year
1975, 1987
Truck Model
K5 Blazer, R1500
Engine Size
454, 350 tbi
It's important to not overtighten the pan bolts too, regardless of the gasket. Steel pans will warp, aluminum pans can crack. I use a torque wrench to make sure they're all tightened evenly to the specified torque.

You must be registered for see images attach
 

Jimbarry

Full Access Member
Joined
Aug 19, 2021
Posts
153
Reaction score
373
Location
California
First Name
Jim
Truck Year
1983
Truck Model
C30
Engine Size
454
Removed all the chrome wheel covers, PIA on gravel and cement driveway. This old back don't move as well as it used to. I had to remove the back ones to get to the extensions so might as well clean all of them up. The wheels didn't have the clip steadier installed for the extension, just the hole/L bracket in the cover. I think this allowed them to whip and ultimately leak. I don't know what they'll do for balance but I plan on installing them. T The The rats/squirrels
You must be registered for see images attach
/mice only got to 3 wires this time, the brown and blue ones for the front side running light and the headlight ground. Not too bad and easily spliced. Onward and upward! Hope this thing hangs in there till I get a workshop/garage. The upper left side of the tire appears mouse chewed.. never saw that before.
 
Last edited:

bucket

Super Moderator
Staff member
Super Moderator
Joined
Aug 3, 2010
Posts
29,966
Reaction score
26,866
Location
Usually not in Ohio
First Name
Andy
Truck Year
'77, '78, '79, '84, '88
Truck Model
K5 thru K30
Engine Size
350-454
Removed all the chrome wheel covers, PIA on gravel and cement driveway. This old back don't move as well as it used to. I had to remove the back ones to get to the extensions so might as well clean all of them up. The wheels didn't have the clip steadier installed for the extension, just the hole/L bracket in the cover. I think this allowed them to whip and ultimately leak. I don't know what they'll do for balance but I plan on installing them. T The The rats/squirrels
You must be registered for see images attach
/mice only got to 3 wires this time, the brown and blue ones for the front side running light and the headlight ground. Not too bad and easily spliced. Onward and upward! Hope this thing hangs in there till I get a workshop/garage. The upper left side of the tire appears mouse chewed.. never saw that before.

I recently put those very same valve extensions on my dually. My simulators (wheel covers) have openings much smaller than the wheels themselves, so I clamped them onto the simulator, rather than the rim. To do that, the clamps needed longer bolts installed. They are metric bolts, M6x1.0 if I recall.
 

ChuckN

Full Access Member
Joined
Nov 8, 2022
Posts
1,208
Reaction score
3,530
Location
Bellinham, WA
First Name
Chad
Truck Year
1981
Truck Model
C10
Engine Size
350
Deleted the old cruise control module that was derelict- and traced the wiring that someone astutely pointed out that had a circuit breaker on it. Turns out it was just routed power to the old trailer brake box.

Someday I’ll trace the wiring for the cruise control that goes through the firewall- it also has some vacuum tubing. Maybe when I get around to redoing the dash pad.

The speedometer cable that is supposed to work for my year is ridiculously to the mm short. I know we’re all trying to save a buck but a little more slack would’ve been nice.

Guess I’m officially ready to start the inner fender conversion. Yay!
You must be registered for see images attach

You must be registered for see images attach
 

pinballlarry1

Supporting Member
Supporting Member
Joined
Nov 8, 2023
Posts
98
Reaction score
385
Location
Kalispell, Montana
First Name
Larry
Truck Year
1981
Truck Model
C10
Engine Size
250 6 cylinder
Finished up the fog lights and bed light project that I have been puttering around with for months.
You must be registered for see images attach

You must be registered for see images attach

Both circuits were sourced from the new auxiliary fuse block and constructed with parts I had on hand. The Bosch fog light kit uses a 30-amp relay, while the 4-led bed light is powered directly from the fuse block and dash switch. I took my time and used a lot of spiral loom and SJO cord. The homemade headache screen makes a great mounting spot for the light, and I was able to zip tie the power cord around the inside where it is well protected. The twin fog lamps mounted into existing holes under the front bumper and getting the power wire up and over was pretty simple. I fabricated the switch plate from scrap aluminum and polished it.
You must be registered for see images attach
I put the manual choke cable on there also, just have to cut a nice rectangular opening in the dash bezel when I get more time. Also installed LED lamps to replace the 5 general illumination bulbs behind the gauges. Gently cleaned the gauges with a paint brush.
You must be registered for see images attach
#168 replacements from EBay, paid $8 for 10. But on a sadder note, I found a coolant drip under the radiator by the lower outlet fitting. Going to have to remove the whole thing for inspection and I hope a nice repair. Really don't want to buy a new radiator......
 

Forum statistics

Threads
43,543
Posts
937,684
Members
35,440
Latest member
brantley
Top