You are using an out of date browser. It may not display this or other websites correctly.
You should upgrade or use an alternative browser.
You should upgrade or use an alternative browser.
Rebuilding my dash pad.
- Thread starter Chris64
- Start date
Disclaimer: Links on this page pointing to Amazon, eBay and other sites may include affiliate code. If you click them and make a purchase, we may earn a small commission.
tycharles
Junior Member
- Joined
- Jan 17, 2024
- Posts
- 8
- Reaction score
- 23
- Location
- Tennessee
- First Name
- Ty
- Truck Year
- 1985
- Truck Model
- c10
- Engine Size
- 305
Thanks man, I guess for full disclosure, I do custom interiors for a living but have still learned a ton from forums like theseThat looks awesome! Congrats.
Chris64
Full Access Member
- Joined
- Sep 16, 2024
- Posts
- 151
- Reaction score
- 230
- Location
- San Diego
- First Name
- Chris
- Truck Year
- 1974
- Truck Model
- K20
- Engine Size
- 350
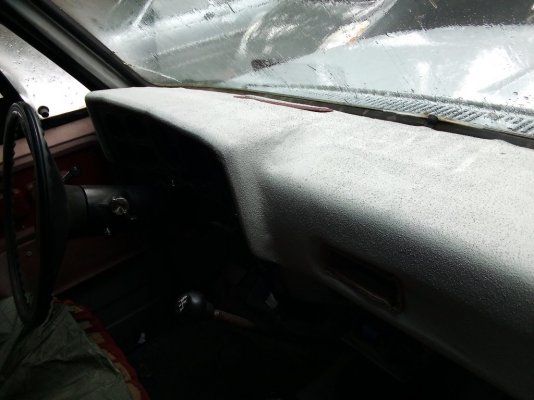
OK, well I got back to the dash project...
I'll share what I learned so far to serve as a warning to others.
So I just used contact cement to attach a bunch of foam pieces. I'm not sure what I could've done better here. It's hard to manage large pieces but in the end seams will show through on the vinyl.
Then I glued more pieces
All the foam attached...ready for sanding.
I'll share what I learned so far to serve as a warning to others.
So I just used contact cement to attach a bunch of foam pieces. I'm not sure what I could've done better here. It's hard to manage large pieces but in the end seams will show through on the vinyl.
You must be registered for see images attach
Then I glued more pieces
You must be registered for see images attach
You must be registered for see images attach
All the foam attached...ready for sanding.
You must be registered for see images attach
Chris64
Full Access Member
- Joined
- Sep 16, 2024
- Posts
- 151
- Reaction score
- 230
- Location
- San Diego
- First Name
- Chris
- Truck Year
- 1974
- Truck Model
- K20
- Engine Size
- 350
Then I started sanding it smooth. The optimal tool for this was a portable belt sander followed up with a block sander.
That went pretty smooth. Here's a test fit. At this point I'm not sure if what I plan to do will work.
All ready for vinyl!
You must be registered for see images attach
That went pretty smooth. Here's a test fit. At this point I'm not sure if what I plan to do will work.
You must be registered for see images attach
You must be registered for see images attach
All ready for vinyl!
Chris64
Full Access Member
- Joined
- Sep 16, 2024
- Posts
- 151
- Reaction score
- 230
- Location
- San Diego
- First Name
- Chris
- Truck Year
- 1974
- Truck Model
- K20
- Engine Size
- 350
OK, here's where things stopped going according to plan.
Any time I've worked with vinyl cloth in the past, it was on door panels, amp racks or speaker boxes. Basically, things I could staple. My experience with contact cement has not been good. Maybe now will be different.
So I started with the valley that I knew would be problematic. And it was. The cloth barely held and certainly wouldn't hold the extreme stretching I'd need to do.
So It was time to face reality. I was going to need to have a seam. I watched a couple videos and my daughter has a sewing machine. I ordered some UV resistant #69 thread as recommended online and made my first stitch. I'm not sure what you call this. A French seam is when you run a stitch down both sides of the seam. The video I saw was all in Spanish so I'm calling this style a Mexican seam.
Next - adventures in gluing!!
Any time I've worked with vinyl cloth in the past, it was on door panels, amp racks or speaker boxes. Basically, things I could staple. My experience with contact cement has not been good. Maybe now will be different.
So I started with the valley that I knew would be problematic. And it was. The cloth barely held and certainly wouldn't hold the extreme stretching I'd need to do.
You must be registered for see images attach
So It was time to face reality. I was going to need to have a seam. I watched a couple videos and my daughter has a sewing machine. I ordered some UV resistant #69 thread as recommended online and made my first stitch. I'm not sure what you call this. A French seam is when you run a stitch down both sides of the seam. The video I saw was all in Spanish so I'm calling this style a Mexican seam.
You must be registered for see images attach
Next - adventures in gluing!!
Chris64
Full Access Member
- Joined
- Sep 16, 2024
- Posts
- 151
- Reaction score
- 230
- Location
- San Diego
- First Name
- Chris
- Truck Year
- 1974
- Truck Model
- K20
- Engine Size
- 350
OK, so gluing went sort of as planned.
Here's what I learned:
* It showed every little imperfection underneath. Most people put a thin padding layer here and I'm guessing that's why.
* All the hot-rod shows have the upholstery guys cut a small channel in the foam for the stitch to fit. Now I see why.
* If all the glue feels cured, and you take your nice new dash out to the car and let it sit in the sun, all the glue will come undone. **
I did it in stages. First the front part.
I bungee'd a cloth on the "valley" over night to ensure it wouldn't pull off.
The next day I did the back half. I should've made better plans for the left side of the dash bezel. It was very hard to get this to wrap around all the compound curves. I probably would've preferred to put in another seam.
I think it looks OK. The screw holes underneath look a little weird in the pic. I c-clamped washers to hold the shape for the stock screws. The defroster vents were not as forgiving as I'd hoped. I would've angles them a little more in retrospect. Over all, it still looks better than anything else on my truck so far and it was a good learning experience. I'll probably try to do something similar for the doors because it's a lot cheaper than buying stuff.
Thanks for attending my Ted Talk.
** I panic repaired everything I think. The contact cement I used was Barge and I thinned it a little but so it would go on easier. It's supposed to be fine for this type of application. I'm hoping if I give it a few days to cure this won't be a problem again.
Here's what I learned:
* It showed every little imperfection underneath. Most people put a thin padding layer here and I'm guessing that's why.
* All the hot-rod shows have the upholstery guys cut a small channel in the foam for the stitch to fit. Now I see why.
* If all the glue feels cured, and you take your nice new dash out to the car and let it sit in the sun, all the glue will come undone. **
I did it in stages. First the front part.
You must be registered for see images attach
I bungee'd a cloth on the "valley" over night to ensure it wouldn't pull off.
The next day I did the back half. I should've made better plans for the left side of the dash bezel. It was very hard to get this to wrap around all the compound curves. I probably would've preferred to put in another seam.
You must be registered for see images attach
I think it looks OK. The screw holes underneath look a little weird in the pic. I c-clamped washers to hold the shape for the stock screws. The defroster vents were not as forgiving as I'd hoped. I would've angles them a little more in retrospect. Over all, it still looks better than anything else on my truck so far and it was a good learning experience. I'll probably try to do something similar for the doors because it's a lot cheaper than buying stuff.
Thanks for attending my Ted Talk.
** I panic repaired everything I think. The contact cement I used was Barge and I thinned it a little but so it would go on easier. It's supposed to be fine for this type of application. I'm hoping if I give it a few days to cure this won't be a problem again.
Chris64
Full Access Member
- Joined
- Sep 16, 2024
- Posts
- 151
- Reaction score
- 230
- Location
- San Diego
- First Name
- Chris
- Truck Year
- 1974
- Truck Model
- K20
- Engine Size
- 350
If I had skill to do this, this makes way more sense. Especially that bezel seam, but that has to be perfect. I may end up getting a chance to try sadly.I filled all the speaker holes (and cracks) with fiberglass/bondo and wrapped in leather. btw I like the seam to just be around the gauge bezel not all the way across like some do. just my 2 centsYou must be registered for see images attachYou must be registered for see images attach
TotalyHucked
Full Access Member
- Joined
- Feb 24, 2020
- Posts
- 4,593
- Reaction score
- 15,204
- Location
- Auburn, Georgia
- First Name
- Zach
- Truck Year
- 1985
- Truck Model
- Sierra 1500
- Engine Size
- 5.3
Man that looks great! Especially for a first try!
tycharles
Junior Member
- Joined
- Jan 17, 2024
- Posts
- 8
- Reaction score
- 23
- Location
- Tennessee
- First Name
- Ty
- Truck Year
- 1985
- Truck Model
- c10
- Engine Size
- 305
Nice job on your first attempt. Usually I will sew my leather or vinyl to 1/4" foam to add some padding and helps to hide the bulk in the seams too. Just a quick patterning tip, you can mark out where your seams are going to be on your piece with a sharpy, lay clear carpet shield (has adhesive backing) over and trace your seam. Pull it off, lay it on your vinyl or leather, add seam allowance and cut. Make sure to add reference marks so you can line them up when sewing. Cheers!If I had skill to do this, this makes way more sense. Especially that bezel seam, but that has to be perfect. I may end up getting a chance to try sadly.
Attachments

Frankenchevy
Proverbs 16:18
- Joined
- Jan 3, 2018
- Posts
- 6,305
- Reaction score
- 8,244
- Location
- USA
- First Name
- Jeremy
- Truck Year
- Square
- Truck Model
- CUCV
- Engine Size
- Small
Looks way better than anything I could pull off. The PO took the same route I would’ve…the lazy one—specifically a dash carpet.OK, so gluing went sort of as planned.
Here's what I learned:
* It showed every little imperfection underneath. Most people put a thin padding layer here and I'm guessing that's why.
* All the hot-rod shows have the upholstery guys cut a small channel in the foam for the stitch to fit. Now I see why.
* If all the glue feels cured, and you take your nice new dash out to the car and let it sit in the sun, all the glue will come undone. **
I did it in stages. First the front part.
You must be registered for see images attach
I bungee'd a cloth on the "valley" over night to ensure it wouldn't pull off.
The next day I did the back half. I should've made better plans for the left side of the dash bezel. It was very hard to get this to wrap around all the compound curves. I probably would've preferred to put in another seam.
You must be registered for see images attach
I think it looks OK. The screw holes underneath look a little weird in the pic. I c-clamped washers to hold the shape for the stock screws. The defroster vents were not as forgiving as I'd hoped. I would've angles them a little more in retrospect. Over all, it still looks better than anything else on my truck so far and it was a good learning experience. I'll probably try to do something similar for the doors because it's a lot cheaper than buying stuff.
Thanks for attending my Ted Talk.
** I panic repaired everything I think. The contact cement I used was Barge and I thinned it a little but so it would go on easier. It's supposed to be fine for this type of application. I'm hoping if I give it a few days to cure this won't be a problem again.
boblee09
Junior Member
- Joined
- Feb 25, 2024
- Posts
- 12
- Reaction score
- 23
- Location
- NC
- First Name
- Eric
- Truck Year
- 1984
- Truck Model
- C10
- Engine Size
- 5.0
This is beautiful. I want to do something except with crocodile. How do you shape it?I filled all the speaker holes (and cracks) with fiberglass/bondo and wrapped in leather. btw I like the seam to just be around the gauge bezel not all the way across like some do. just my 2 centsYou must be registered for see images attachYou must be registered for see images attach
wooden shoe
Junior Member
- Joined
- Mar 25, 2025
- Posts
- 4
- Reaction score
- 1
- Location
- kitsap co wa
- First Name
- jon
- Truck Year
- 1982
- Truck Model
- c10
- Engine Size
- 305
I did mine with spray foam, then covered it with 4 way Strech fabric and spray contact cement, I also put 6x8 speakers behind the air conditioning vents with hard foam to seal for base response.
Then I used latex floor paint to seal the fabric, 2 coats.
I need to find a suitable grill, but the tunes sound good.
Then I used latex floor paint to seal the fabric, 2 coats.
I need to find a suitable grill, but the tunes sound good.