350 engine swap videos

Disclaimer: Links on this page pointing to Amazon, eBay and other sites may include affiliate code. If you click them and make a purchase, we may earn a small commission.

LAsquarebody

Junior Member
Joined
Oct 19, 2021
Posts
14
Reaction score
6
Location
Los Angeles
First Name
Saxon
Truck Year
1984
Truck Model
GMC K1500
Engine Size
crate 350
Hey guys, well its time to charge the heart beat in this old Squarebody. I have done a lot of work on cars and trucks over the years but its been a long time since I did a full swap. I was curious if anyone had a how to video that could walk me back thru the little things I might have forgotten about prepping a vehicle for an engine pull and reload? Ive googled a bit but keep getting things that havent been as helpful as I'd like.

Anyways Im planning to start on this next weekend.

Pics to follow

Thanks for your help
 

newguy11

Full Access Member
Joined
Aug 24, 2021
Posts
92
Reaction score
189
Location
New England
First Name
Private
Truck Year
1972-1987
Truck Model
C/k 10
Engine Size
305/350
Make certain you used good grade 8 bolts if you are using an engine stand… this cost me 2 hours the other day
You must be registered for see images attach
 

newguy11

Full Access Member
Joined
Aug 24, 2021
Posts
92
Reaction score
189
Location
New England
First Name
Private
Truck Year
1972-1987
Truck Model
C/k 10
Engine Size
305/350
Just about everything is 9/16 , 5/8 or 3/8. I did have a couple oddball metric in my 1985 too.

I’m in the process of a swap and 2 things that made my life much easier was spraying all the bolts multiple times over several days with a good penetration fluid and also using air tools. The wrapping of an impact gun reduces the Likelihood of a snapped bolt. In my case the only bolt to break was an exhaust bolt that I tried to remove by hand.

Take the engine out in stages.

Remove battery. Starter, y pipe . Transmission inspection plate, flex plate-torque converter bolts (15mm), 6 bolts around the tranny and the motor mount cross bolts. Also while your down here, on the starter side of the engine there is a clip bolted to the oil pan that holds the trans cooler lines ( un bolt that)

It’s good practice to remove the electrical connections from both sides of the tranny. And put a jack underneath to support it.

Up top there are no surprises to be had drain the radiator, remove the upper fan shroud and the fan to get some more working room. Leave the a/c and power steering line connected and lay them in the engine bay. After that I think everything is fairly obvious . Take your time, label and uses plastic baggies.
 
Last edited:

StickyLifter

Full Access Member
Joined
May 28, 2022
Posts
144
Reaction score
252
Location
N/A
First Name
Screw You Homophobes
Truck Year
N/A
Truck Model
N/A
Engine Size
N/A
Take pictures of your linkages and vacuum lines. I would spray the exhaust bolts with penetrating oil a few days ahead of ime.
 

LAsquarebody

Junior Member
Joined
Oct 19, 2021
Posts
14
Reaction score
6
Location
Los Angeles
First Name
Saxon
Truck Year
1984
Truck Model
GMC K1500
Engine Size
crate 350
Make certain you used good grade 8 bolts if you are using an engine stand… this cost me 2 hours the other day
You must be registered for see images attach
I have a bachelors in tap and dye at this point but because my trans case. The trans dip stick popped out at one point so I ordered a Lokar braided steel replacement but upon undoing the the trans pan I found silicone in a few bolt holes. Needless to say they were striped and made myself a nice afternoon of rolling around in aluminum shards on the ground while I tapped out and helicoiled the pan in a few spots.
 

LAsquarebody

Junior Member
Joined
Oct 19, 2021
Posts
14
Reaction score
6
Location
Los Angeles
First Name
Saxon
Truck Year
1984
Truck Model
GMC K1500
Engine Size
crate 350
Just about everything is 9/16 , 5/8 or 3/8. I did have a couple oddball metric in my 1985 too.

I’m in the process of a swap and 2 things that made my life much easier was spraying all the bolts multiple times over several days with a good penetration fluid and also using air tools. The wrapping of an impact gun reduces the Likelihood of a snapped bolt. In my case the only bolt to break was an exhaust bolt that I tried to remove by hand.

Take the engine out in stages.

Remove battery. Starter, y pipe . Transmission inspection plate, flex plate-torque converter bolts (15mm), 6 bolts around the tranny and the motor mount cross bolts. Also while your down here, on the starter side of the engine there is a clip bolted to the oil pan that holds the trans cooler lines ( un bolt that)

It’s good practice to remove the electrical connections from both sides of the tranny. And put a jack underneath to support it.

Up top there are no surprises to be had drain the radiator, remove the upper fan shroud and the fan to get some more working room. Leave the a/c and power steering line connected and lay them in the engine bay. After that I think everything is fairly obvious . Take your time, label and uses plastic baggies.
I listened friend. Still taking my sweet a** time as I do have to make a living as well but not biting off more than you can chew in a days work is what has kept me sane. of course this is because in the beginning I would show up and want to get 5 different things done and then the first job of that afternoon would throw me a curveball and Id be trying to figure out a work around for the next few hours.

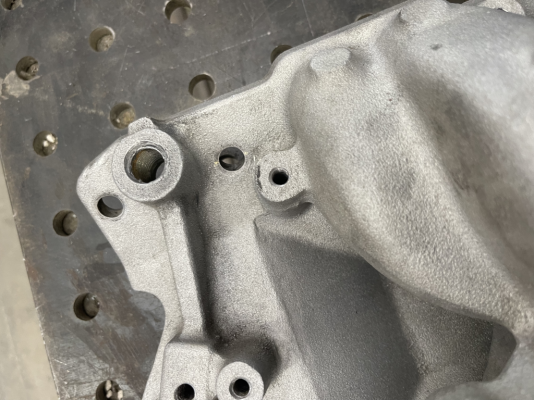
Just for reference. I was bolting it all back together with new engine in, and I find one of the water temp sensor slots on the intake manifold has some JB weld covering the first few threads and that's why I can't get a plug in. I defiantly cannot tap out the open port, and my welder says the arc will detonate the residual oil in the engine and light the whole thing on fire, so pull the manifold it is. Upon inspecting the distributor prior to removal I notice the inner wires are detached and the tiny screws are missing that hold the inner wires flush as to not interfere with the rotating upper part. So now Im buffing up on MSD distributors like Im studying for the SATs cause of all things frying out this distributor would be an expensive lesson I don't wanna pay for lol.

But all in all its been a hoot. Long days, but Ive learned more about some stuff I didn't know I needed to learn.
 

Attachments

  • tempImageO1CHZx.png
    tempImageO1CHZx.png
    1 MB · Views: 44
  • tempImagegWjXmL.png
    tempImagegWjXmL.png
    1.1 MB · Views: 50
  • tempImagezgonqM.png
    tempImagezgonqM.png
    1.5 MB · Views: 52

LAsquarebody

Junior Member
Joined
Oct 19, 2021
Posts
14
Reaction score
6
Location
Los Angeles
First Name
Saxon
Truck Year
1984
Truck Model
GMC K1500
Engine Size
crate 350
Take pictures of your linkages and vacuum lines. I would spray the exhaust bolts with penetrating oil a few days ahead of ime.
This was hilarious to me once I got in there and looked at those bolts. You weren't lying. I think Squares have conjured up a new form of rust.
 

PrairieDrifter

Full Access Member
Joined
Dec 28, 2014
Posts
3,882
Reaction score
5,717
Location
North Dakota
First Name
Mason
Truck Year
84,79,77,76,70,48
Truck Model
Suburban k10, bonanza k10, k30, k20, c10, gmc 1/2ton
Engine Size
350, 350, 350, 350, 350, 350
Manifold bolts are always the killer, no matter the make. I've torn down hundreds of engines, those and oil gallery and water jacket plugs were the biggest time consumers.
 

Latest posts

Forum statistics

Threads
44,448
Posts
958,183
Members
36,820
Latest member
Milkshake
Top