First time "real" painting.

Disclaimer: Links on this page pointing to Amazon, eBay and other sites may include affiliate code. If you click them and make a purchase, we may earn a small commission.

CountKrunk

Full Access Member
Joined
Aug 3, 2023
Posts
401
Reaction score
939
Location
SW VA
First Name
Count
Truck Year
1984
Truck Model
C20 Custom Deluxe 3+3
Engine Size
v8 350
looks sick @Nardulli !

my plan is to blast it to bare metal, as there are so many layers of **** on it. fix the metal as best i can.

Then watcha plethora of youtube videos and go from there haha.

I know martin bros customs goes back to bare metal, applies a skim coat. Gets that smooth af then they do the paint process. Of course those guys are master painters lol, don't know what the paint process is but it takes them a while. So im assume it has a lot of steps.

i want to do a two tone blue.
 

hey mister

Full Access Member
Joined
Jun 15, 2024
Posts
197
Reaction score
526
Location
North Coast
First Name
Marty
Truck Year
1978
Truck Model
C10
Engine Size
350
Well...that was special.
Hood is done and my brain is still doing 100mph.
Shooting the color was completely different than the clear. Clear was like shooting water.
With the color, my passes were spaced too wide and I moved too fast. With the clear, I moved way too slow.
Ended up with a little orange peel here and there and decent sized run of clear.
But it's all good. This was all about gaining experience. (And this is way better than anythin on the taco now) Like a lot of things in life, ya just gotta step out and do it.
I do have alot to learn with getting the gun adjusted right and patients. I always struggle with patients. The biggest thrill was knowing I did it. Not perfect, but certainly not fubar.
I know the next step is cut & buff, but that's expensive too. So, the big 10's roof and cap will probably get that treatment when the time comes. The taco's fenders and the big10's rocker repair will just be as shot.
I bet paint for that big wedge cap is gonna run 5 bills.

I just have to ask...what is with all the freaking little tiny "no-see-ems" being attracted to wet paint? Dag-gummit anyway!! Good argument for a paint booth.

I probably won't do the fenders until spring. I got lots to do before winter.
 

Attachments

  • IMG_20241006_102436_939.jpg
    IMG_20241006_102436_939.jpg
    126.4 KB · Views: 17
  • IMG_20241006_102447_173.jpg
    IMG_20241006_102447_173.jpg
    83.6 KB · Views: 16
  • IMG_20241007_153041_064.jpg
    IMG_20241007_153041_064.jpg
    129.8 KB · Views: 16
  • IMG_20241007_153054_912.jpg
    IMG_20241007_153054_912.jpg
    140.6 KB · Views: 16
  • IMG_20241007_171019_591.jpg
    IMG_20241007_171019_591.jpg
    56.6 KB · Views: 15

Grit dog

Full Access Member
Joined
May 18, 2020
Posts
6,828
Reaction score
11,925
Location
Auburn, Washington
First Name
Todd
Truck Year
1986, 1977
Truck Model
K20, C10
Engine Size
454, 350
Ya nice job! If you ain’t gettin the runs here or there you’re not spraying a wet enough coat. That looks great out of the gun in the one pic.
 

Grit dog

Full Access Member
Joined
May 18, 2020
Posts
6,828
Reaction score
11,925
Location
Auburn, Washington
First Name
Todd
Truck Year
1986, 1977
Truck Model
K20, C10
Engine Size
454, 350
@Doppleganger, don’t obsess about the exact grit for prep. Or actually if you want to out your brain at ease, hit a spot each with different grits, skim bondo over it and see if it doesn’t stick.
Even though it all feels smooth, lower grit has more bite or surface area. On a microscopic scale, 1000grit looks like Kansas and 100grit looks like the foothills of the Rockies.
Any paint, IMO, finer grit does not make it bond less. And to that point, I’m sure I’ve bondoed over 400 or 600 but I usually don’t.
Scuff all the epoxy with 220-320 when the time comes. If you’re worried about the bondo areas just scratch em quick with some 60-100. But it’ll stick either way.
 

fast 99

Full Access Member
Joined
Dec 31, 2021
Posts
1,957
Reaction score
2,807
Location
Spokane, Washington
First Name
Brian
Truck Year
81,85
Truck Model
K20
Engine Size
350
I just sprayed my cab with epoxy primer yesterday - first time I pulled a spray gun trigger in 30 yrs. I thought it came out fine.

Today was told that I cannot paint over "cured" epoxy. ?! Never heard that before.
True,
can only speak about PPG DP epoxy has a 7 day recoat. After that scuff and another coat of DP. If I needed the time, sprayed a surfacer over the DP otherwise color or sealer within 7 days. Surfacer does not have a recoat limit. A good thing about DP is mud can be spread directly over it.
 

hey mister

Full Access Member
Joined
Jun 15, 2024
Posts
197
Reaction score
526
Location
North Coast
First Name
Marty
Truck Year
1978
Truck Model
C10
Engine Size
350
Update:
I used a reducer in the clear after having been instructed not to. (and he wonders why he gets a run) I had not realized I reduced until long after dark. After talking to a couple collision guys, they said they always use reducer in the clear. NBD.
I'm going to change my "spit happens" remark to "runs happen". (dual meaning)

So, after 24 hours, I flipped the hood over and cleaned the under side and then rattle canned a Rustolum truck bed liner on.
Dang! I should of just done that to the top and saved myself a few hundo.
Yea, education ain't cheep.
 

Attachments

  • IMG_20241008_154554_320.jpg
    IMG_20241008_154554_320.jpg
    244.2 KB · Views: 12

hey mister

Full Access Member
Joined
Jun 15, 2024
Posts
197
Reaction score
526
Location
North Coast
First Name
Marty
Truck Year
1978
Truck Model
C10
Engine Size
350
Update:
Original hood was unbolted and tossed aside, yep tossed. (That was fun..lol)
The new-ish hood was bolted in and easily aligned.
In spite of its few tiny flaws, it looks so awesome. Brought back memories of 20+ years ago, when it was 200,k mikes less.
 

Attachments

  • IMG_20241008_174756_541.jpg
    IMG_20241008_174756_541.jpg
    131.7 KB · Views: 12
  • IMG_20241008_174846_032.jpg
    IMG_20241008_174846_032.jpg
    141.4 KB · Views: 13
  • IMG_20241008_174858_520.jpg
    IMG_20241008_174858_520.jpg
    109.5 KB · Views: 11
  • IMG_20241008_181747_176.jpg
    IMG_20241008_181747_176.jpg
    230.1 KB · Views: 13

chasw44

Junior Member
Joined
Aug 3, 2024
Posts
10
Reaction score
10
Location
central texas where else?
First Name
charles
Truck Year
1991, 1986, 1993, 1963, 1979
Truck Model
ck2500
Engine Size
5.7
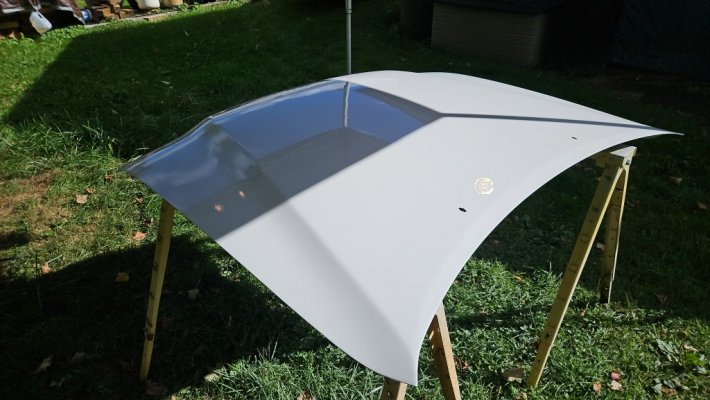
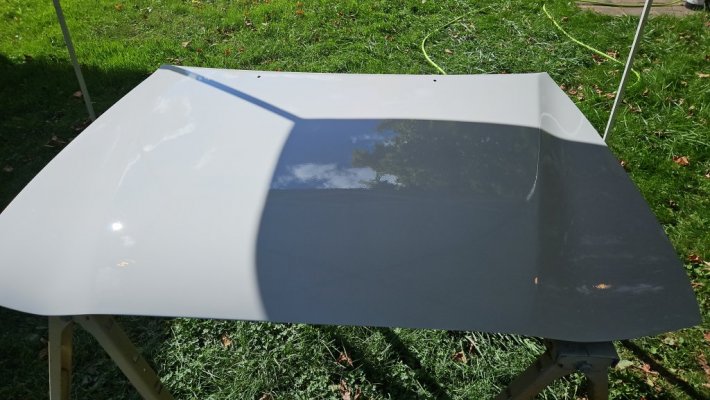
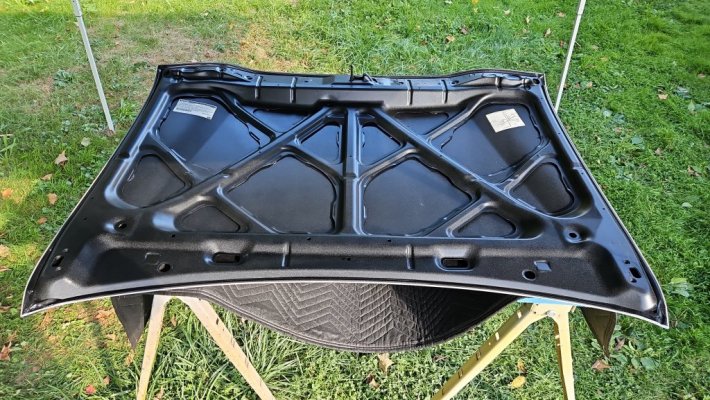
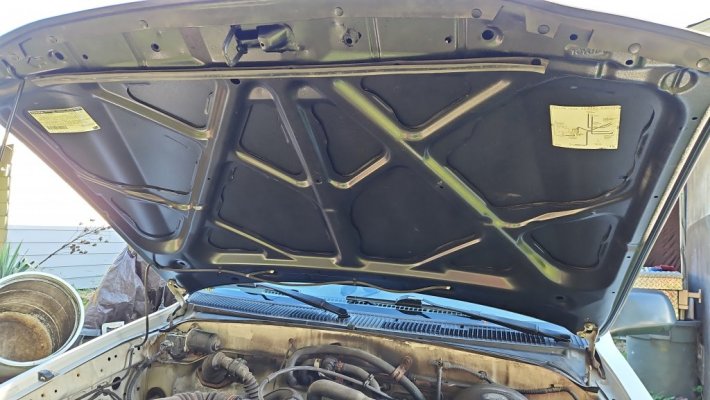
ok, ppg primers were non sanding epoxies down first then sanding primer over that then any filler on that. non sanding usually means it will "ball" up under sand paper but you can get by with scotchbrite if you clean it out after a few swipes usually to get some trash out before the sandable primer goes down the epoxy primer is always the glue for everything on top. most driveway paint jobs will take 30% more paint because of the waste in getting bugs and other trash out. always go off the edge a ways to make sure the edges are covered and go 90* to the pass below. I always paint the edges first because the corners and edges always will have less paint left after blowing the paint on them. start in the middle and work out, and hang your panels upright to avoid bugs landing on them. also a fenfer painted laying flat will look different than the side panel on the body just because the paint lays on different. non-sanding epoxy can also be used as a sealer if it is thinned just before the top coat goes on. a sealer coat is used to make sure all the work under it is covered and a smoother top coat will be the outcome. in the reality car builds it shows some celebrity painters painting the sides before the top, that seems so backwards to me. try leaning over a freshly painted door to paint a roof and not dragging either the hose or your beer belly against the fresh paint. urethanes dont have the overspray that poly paints or what used to be enamels did. I will say that i possibly got irregular heartbeat and maybe some lung damage from not wearing my facemask enough but most of my painting was outside. Once while working for a friend parttime in a fab shop I painted some m&m mars blue frames and when I got home my leather embossed belt had blue enamel with hardner on the backside all the way around. 20years later its still there. I'm thinking I probably did inhale some of that even though I was wearing a paint mask with a disposible filter, hell I was even blue in the corners of my nose and on my eyelids, it was not a good paint booth. that was commercial enamel with hardner which stays tacky much longer than urethanes but might be safer for the diyer. I learned to paint in a factory that made lifetime filling stations in the 60's. they were steel covered porcelain. it was on a overhead conveyor system that circled through a oven constantly moving. the paint was powdered glass mixed with water coming out of 80 gallon roll around pressurized tanks. the panels got a black undercoat first then later they got a colorcoat. one guy on the back which was me and the two more experienced painters on the front, the back has the same sides as the front so you gotta be pretty organized and fast to keep up. I started out taking the panels off out of the oven and stacking them on buggies then graduated to the mill room where we mixed the porcelain the shift before it was used. I painted on 2nd and 3rd shift, that was a long long time ago.
 

chasw44

Junior Member
Joined
Aug 3, 2024
Posts
10
Reaction score
10
Location
central texas where else?
First Name
charles
Truck Year
1991, 1986, 1993, 1963, 1979
Truck Model
ck2500
Engine Size
5.7
they make what they call nib files that do just that you can file the nibs down and it saves cutting and buffing time they also work on sags or runs but you gotta be careful as a run or sag can take several days to harden, if you mess with it too soon it can cause a mess.
 

Latest posts

Forum statistics

Threads
43,850
Posts
944,467
Members
35,876
Latest member
Maxw1987
Top