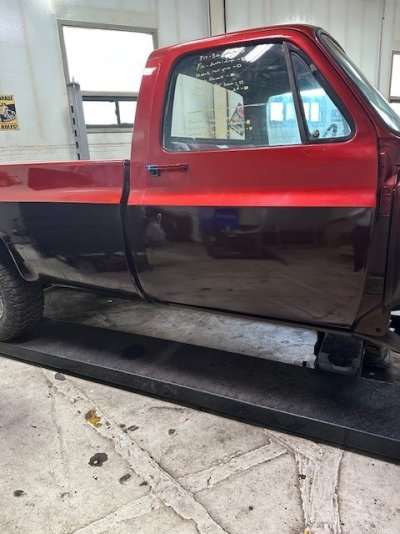
First time "real" painting.

Disclaimer: Links on this page pointing to Amazon, eBay and other sites may include affiliate code. If you click them and make a purchase, we may earn a small commission.

Girth

Full Access Member
Joined
Feb 25, 2023
Posts
97
Reaction score
283
Location
Olympia WA
First Name
Garth
Truck Year
1989
Truck Model
V2500 Suburban
Engine Size
350
Not much. Just heard this today, along with a '72 hr window' (was someone who does ALOT of higher end paint jobs too). I had always expected to have to scuff or sand it before high build primer, but never heard that it wont stick to 'cured' epoxy. WTF are you supposed to do - primer, seal, and paint all in one day? Only been 24hrs so I'd like to know if this is true or hype. I've known cars that sat in epoxy (covered) for years and then scuffed and finished. Dunno.
Ugh... googled, can't find much info on that product. Seems that TDS is missing the rest of the info, that would cover topcoating it.

I'd assume scuff/clean/topcoat, after it cures. Can't imagine it's different from most every other similar product. My TDS says....

Time to Topcoat
(Primer Option)
• Allow a minimum of 1 hour per coat
and a maximum of 24 hours at 75°F.
• Between 24–72 hours, primer must
be sanded prior to topcoating
• After 72 hours, primer must be
sanded and recoated with a single
coat prior to topcoating.

That's a Lumabase DTM epoxy though. Can't imagine yours is THAT much different?
 

Doppleganger

Full Access Member
Joined
May 24, 2019
Posts
12,684
Reaction score
58,813
Location
OH-MI: Just like it sounds
First Name
Chris
Truck Year
1985
Truck Model
K20
Engine Size
5.7
Ugh... googled, can't find much info on that product. Seems that TDS is missing the rest of the info, that would cover topcoating it.

I'd assume scuff/clean/topcoat, after it cures. Can't imagine it's different from most every other similar product. My TDS says....

Time to Topcoat
(Primer Option)
• Allow a minimum of 1 hour per coat
and a maximum of 24 hours at 75°F.
• Between 24–72 hours, primer must
be sanded prior to topcoating
• After 72 hours, primer must be
sanded and recoated with a single
coat prior to topcoating.

That's a Lumabase DTM epoxy though. Can't imagine yours is THAT much different?
I just talked to a guy thats worked in a dealer body shop for 20 yrs. He said to leave it til Spring then sand it all with 220 - and apply my high build. So sounds like I'll be hand sanding til I puke.

Only thing he mentioned that I question is my roof - I had bad oil canning and got it straightened out about 95% - but will still need a skim coat of bondo to make it 100%. He suggested sanding the epoxy off to bare metal and mudding that instead. Dunno.

Sorry to the OP for my mini-hijack.
 

Girth

Full Access Member
Joined
Feb 25, 2023
Posts
97
Reaction score
283
Location
Olympia WA
First Name
Garth
Truck Year
1989
Truck Model
V2500 Suburban
Engine Size
350
I just talked to a guy thats worked in a dealer body shop for 20 yrs. He said to leave it til Spring then sand it all with 220 - and apply my high build. So sounds like I'll be hand sanding til I puke.

Only thing he mentioned that I question is my roof - I had bad oil canning and got it straightened out about 95% - but will still need a skim coat of bondo to make it 100%. He suggested sanding the epoxy off to bare metal and mudding that instead. Dunno.

Sorry to the OP for my mini-hijack.
While I've no background worthy of questioning a pro..... my TDS says to final sand the epoxy with 400-600 before topcoat. To me, that sounds like scotchbrite will do the job? All your edges on the cab, hand sanding the epoxy sounds like you're be touching up a bunch of edges where you burn through? Everyone has their methods I guess, and maybe some product variations?

In my reading there is a TON of argument over the body filler though. lol Some insist on bare metal. The "new tech" guys are adamant that modern epoxies allow the filler to adhere just fine (IF it's fresh epoxy, or prepped properly). The supposed benefit of filler over epoxy (if done right, so it bonds to the epoxy well), is the epoxy won't allow any water absorbed by the filler later on (say you get a paint chip) to get to your base metal, and start rusting under the filler.

I'm of the mind to fall back on my favorite saying It's a helicopter (well, truck, in this case), NOT the freakin' space shuttle. Just FIX it. :rotflmao: I've got some light filler where I sanded through to bare metal. Some that were skimmed over the epoxy too. Time will tell.
 

Grit dog

Full Access Member
Joined
May 18, 2020
Posts
6,966
Reaction score
12,215
Location
Auburn, Washington
First Name
Todd
Truck Year
1986, 1977
Truck Model
K20, C10
Engine Size
454, 350
Bottom line is regardless of what kind of paint or primer or clear, you have to sand (scuff) it before carrying on.
Too late now, but areas where you’re presumably not doing any more primer, like inside the cab and jambs, underside of hood etc, consider painting it right away. Pain in the ass to scuff all those areas.
Fortunately if you’re as bad of a painter as me, and as slow, that ain’t gonna happen, at least on the parts you can see, so I can use the extra sanding. Thanks to my shoddy body work. Ain’t bad on flat panels. Can machine sand epoxy, filler primer. But there’s usually enough blocking in filler coats it’s mostly by hand. Lol.
 

Doppleganger

Full Access Member
Joined
May 24, 2019
Posts
12,684
Reaction score
58,813
Location
OH-MI: Just like it sounds
First Name
Chris
Truck Year
1985
Truck Model
K20
Engine Size
5.7
Bottom line is regardless of what kind of paint or primer or clear, you have to sand (scuff) it before carrying on.
Too late now, but areas where you’re presumably not doing any more primer, like inside the cab and jambs, underside of hood etc, consider painting it right away. Pain in the ass to scuff all those areas.
Fortunately if you’re as bad of a painter as me, and as slow, that ain’t gonna happen, at least on the parts you can see, so I can use the extra sanding. Thanks to my shoddy body work. Ain’t bad on flat panels. Can machine sand epoxy, filler primer. But there’s usually enough blocking in filler coats it’s mostly by hand. Lol.
Sounds like regardless of the bare metal vs primer for bondo argument.....if you use epoxy you're almost forced to use bondo on bare metal in order to get it into paint ASAP. Seems like too much of a PITA to ever use it again.
 

Grit dog

Full Access Member
Joined
May 18, 2020
Posts
6,966
Reaction score
12,215
Location
Auburn, Washington
First Name
Todd
Truck Year
1986, 1977
Truck Model
K20, C10
Engine Size
454, 350
Sounds like regardless of the bare metal vs primer for bondo argument.....if you use epoxy you're almost forced to use bondo on bare metal in order to get it into paint ASAP. Seems like too much of a PITA to ever use it again.
I’m just a shade tree. But you needed to use epoxy or etching because you went to bare metal.
. I wouldn’t use it otherwise I think.
Not a big deal. And sanding to metal for bondo should be quick and easy. You don’t put epoxy on thick.
 

Doppleganger

Full Access Member
Joined
May 24, 2019
Posts
12,684
Reaction score
58,813
Location
OH-MI: Just like it sounds
First Name
Chris
Truck Year
1985
Truck Model
K20
Engine Size
5.7
At this point, I'm considering letting it sit til Spring, then having it stripped....again.....and planning on the bondo to metal circus, painting in one day, maybe a whole different primer and just go from there. Sanding the large flat areas is no big deal but the firewall is a PITA - why I stripped it in the first place (had alot of rust and undercoating in the seams and crevices where you couldn't get). Hinges will get blasted again for sure. Gives me a few months to come up with $ anyways. Thing is worse than a boat.

I'm not even a shade tree - just a fking idiot. I'm about done with the whole mess. Wonder what its worth as it sits?
 

legopnuematic

Licensed Junk Dealer
Supporting Member
Joined
Oct 27, 2016
Posts
2,503
Reaction score
6,452
Location
MO
First Name
Spencer
Truck Year
1971, 1̶9̶7̶4, 1976, 1979,1̶9̶8̶5, 2002
Truck Model
Dart Swinger, Sierra 10, C10 Cheyenne, C10 Big Ten, Silverado 10, Ram 2500
Engine Size
225/6, 350 c.i., 350 c.i., 5.9l Cummins
I cannot speak to that specific epoxy you used, but for the Tamco epoxy products, that outside of the recoat window, just sand 180-220 and apply filler on top of the epoxy (after normal cleaning procedures, of course). Same for their 5300 series high build primers.

I have done it both ways, filler over primer, and under primer on bare metal. If all else equal, there should not be a difference using modern materials. I prefer to apply filler over a primed substrate however.

As far as sanding to recoat, I would recommend if you do not already, to pick up a 2” random orbit sander, 5 or 6” random orbit, and foam interface pads for both.

The interface pads are just thick foam pads that go in between the sander platen and the sanding disc, allowing it to form itself to the panel.
 

Grit dog

Full Access Member
Joined
May 18, 2020
Posts
6,966
Reaction score
12,215
Location
Auburn, Washington
First Name
Todd
Truck Year
1986, 1977
Truck Model
K20, C10
Engine Size
454, 350
At this point, I'm considering letting it sit til Spring, then having it stripped....again.....and planning on the bondo to metal circus, painting in one day, maybe a whole different primer and just go from there. Sanding the large flat areas is no big deal but the firewall is a PITA - why I stripped it in the first place (had alot of rust and undercoating in the seams and crevices where you couldn't get). Hinges will get blasted again for sure. Gives me a few months to come up with $ anyways. Thing is worse than a boat.

I'm not even a shade tree - just a fking idiot. I'm about done with the whole mess. Wonder what its worth as it sits?
Why would you strip it again? Makes no sense.
How much bondo could you have on the bare cab? If it’s that much, it may be the wrong cab? I never saw the truck before you disassembled it. How bad is/was it?
It seems you’re still making this more complicated than it needs to be. No reason to berate yourself, your work to date looks great.
What you’re doing, a nut and bolt restoration basically, is infinitely more time consuming and costly than even a great body-on paint job and light resto.
Presumably that was your original goal? A frame off resto? Not a future daily driver.
 

Grit dog

Full Access Member
Joined
May 18, 2020
Posts
6,966
Reaction score
12,215
Location
Auburn, Washington
First Name
Todd
Truck Year
1986, 1977
Truck Model
K20, C10
Engine Size
454, 350
I cannot speak to that specific epoxy you used, but for the Tamco epoxy products, that outside of the recoat window, just sand 180-220 and apply filler on top of the epoxy (after normal cleaning procedures, of course). Same for their 5300 series high build primers.

I have done it both ways, filler over primer, and under primer on bare metal. If all else equal, there should not be a difference using modern materials. I prefer to apply filler over a primed substrate however.

As far as sanding to recoat, I would recommend if you do not already, to pick up a 2” random orbit sander, 5 or 6” random orbit, and foam interface pads for both.

The interface pads are just thick foam pads that go in between the sander platen and the sanding disc, allowing it to form itself to the panel.
+1 on all of the above. Confirming that bondo works on bare metal, primer or paint as well.
There are considerations when not going to bare metal, like how much you trust the bond of the layer(s) below the bondo, down to the metal. Other wise it’s scuff, smear, sand.
 

hey mister

Full Access Member
Joined
Jun 15, 2024
Posts
213
Reaction score
563
Location
North Coast
First Name
Marty
Truck Year
1978
Truck Model
C10
Engine Size
350
I know this thread has been side-tracked a couple times...guys, that's ok.
You never know when somebody is learning from it. And that's what it's all about. This painting thing is freaking expensive and mistakes can be costly in both time and money. And it certainly doesn't help the confidence.

So, it looks like I might be able to shoot color and CC today, Lord willing.
Wish me luck.
Update will follow.
 

Doppleganger

Full Access Member
Joined
May 24, 2019
Posts
12,684
Reaction score
58,813
Location
OH-MI: Just like it sounds
First Name
Chris
Truck Year
1985
Truck Model
K20
Engine Size
5.7
Good luck Marty - sorry for the derailment pal....it happens alot.

I never intended on a nut-bolt resto. Truck was a mess when I got it. Other than a solid bod, everything else was a wash. SRO says my brakes are JB7 but it had JB6 calipers on it complete with a master cyl from an 87 Hurst Olds (I know this because that was written all over it in yellow JY marker). Wiring was a mess - all of it. Transfer case; entire heater core was missing. Column was (we think) out of a van. More I looked....the worse it got....the more I looked. Just never saw it turning into the $$$ mess its become. A mistake from the beginning.

On this epoxy mess - I read guys saying they use red scotch brites or 180grit paper to rough it enough to top coat it no problem. I used a 220 sanding block on a b-pillar and that made it smoother than I would think you'd want for adhesion. ?! Dunno. Am planning on pulling the hinges and sand blasting them again - when its time for color I'll primer the hinges again and top coat within the alloted time (providing I find a data sheet that isnt worthless).

If I knew that some 180 on a DA would scuff that top enough to skin coat some mud on it (over top the epoxy) I'd do it. Had some oil canning on the roof - got 90-95% of it out but it still needs a skin coat to make it 100%. The epoxy sealing the metal (first most) and the mud going over it makes more sense to me than stripping it bare again but what do I know? Never had to do bodywork - had 3 guys that did it. Two of those guys are gone now and one is 105 lbs on oxygen.

Sorry for the rant fellas and thanks for the help - is very appreciated.
 

Grit dog

Full Access Member
Joined
May 18, 2020
Posts
6,966
Reaction score
12,215
Location
Auburn, Washington
First Name
Todd
Truck Year
1986, 1977
Truck Model
K20, C10
Engine Size
454, 350
^Sorry as well Marty for de-railing your thread with my responses to @Doppleganger.
@Doppleganger, I’ve never used adhesion promoter at all, much less epoxy primer, but in your position, I’d research that and think about it for the impossible/hard to reach areas. Like door hinges, etc.
Idea being minimize re-work but get just enough bond for the hidden stuff.
Regarding primer/paint prep, 220 is rough. And more than enough to scuff/prep for subsequent coats. Example, used 220 for sanding multiple coats of primer fixing a plastic bumper yesterday. Don’t have any paint for it yet, so when I was “done” I shot it with some rattle can white paint to 1. Hide it until I finish the job. And 2. To see how much more sanding it will take. It’s ugly up close with paint over 220.
For reference, 320grit min on top coat primer or the scratches will telegraph thru the base coat. I usually go 220-320 between primer coats and filler. 400 on top coat primer, 600-800 on base coat. 800-1000 on clear.
 

Doppleganger

Full Access Member
Joined
May 24, 2019
Posts
12,684
Reaction score
58,813
Location
OH-MI: Just like it sounds
First Name
Chris
Truck Year
1985
Truck Model
K20
Engine Size
5.7
Funny - one body shop tells me 180 (on a DA) - then I went to the shop I bought everything at and they said 320. Guy who owns the place had his own shop for 35 yrs - said to mud over 320 scuffed epoxy will work fine, but since I have no heated shop, he wouldn't do it til I was ready to put high build and sealer over it. Next week's weather is 50s/30s so its coming. And fwiw....this primer has no data sheet in its own name, but is made by CPI so they use their other branded sheet for this one. wtf?

Also mentioned that since things like the dash and inside firewall isn't in the outside elements, I could use red scotch brites on those areas and it will stick fine.

Learn something new every day. For all I know they could all be as nuts as I am. Will find out next Spring.
 

Nardulli

Supporting Member
Supporting Member
Joined
Jun 18, 2024
Posts
25
Reaction score
45
Location
St Louis
First Name
Jim
Truck Year
1985
Truck Model
C15
Engine Size
350
Welllllll..... Let me say that I know how you are feeling. Last time I painted, Jimmy Carter was president. And it was simple. Prep, prime, prep. tack. shoot. Not so much any more. I just painted my 85 GMC - let's just say I painted most of it twice. A good sealer is a godsend. Then base coat. Depending on your paint, there could be a mid coat. Then clear coat. It's the clear that will get you. REALLY. I opted for a two tone. Sherwin Williams BC8 line, combined the base and mid, making it way easier. $480 per QUART. (not a typo). What saved my back side was a you tube channel. Do yourself a favor, and watch this guy's videos: https://www.youtube.com/@PaintSociety/videos

To get clear to lay down, and not orange peel like crazy, you have to nail a few factors. 1) get as slow a reducer as you can. This gives the clear time to flatten out. It was hot when I painted mine, so that worked out. 2) gun set up is key. If you are using HVLP, you have to dial in enough PSI to fully atomize the spray. Too fast a reducer and the paint will be dry by the time it hits the panel. (ask me how I know). Too low PSI and you end up spitting on globs, - and there's your orange peel. 3) You have to ALWAYS maintain a wet edge. 1st coat of clear can be a bit light, even a little dry. Let that flash, and you will have a sticky surface for the second coat. Use about a 70% overlap, nice and close, and MOVE fast, about 4-5" from surface.

Also, buy plenty of Naked Gun spray cans. Makes getting your gun clean very easy.

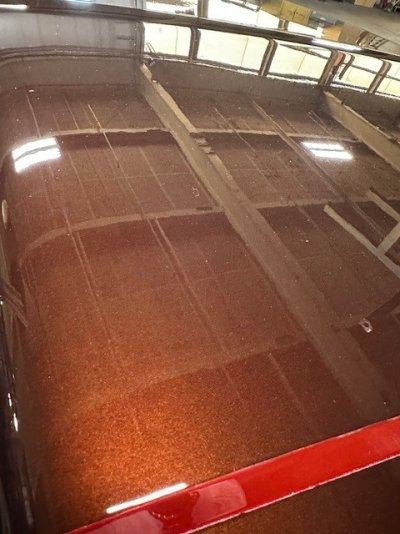
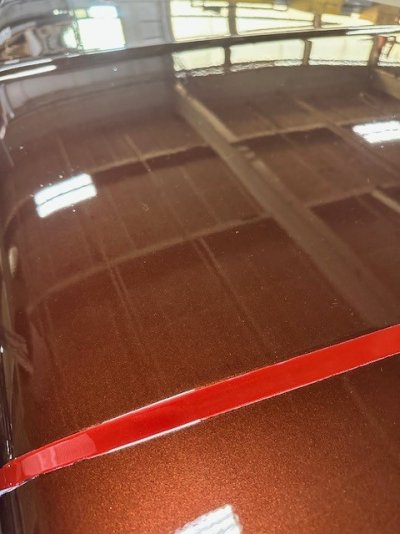
Here's how my truck looks now. I know it looks black on the side view, but that's just lighting. The bottom and hood area actually the bronze color.
 

Attachments

  • hood 2.jpg
    hood 2.jpg
    91.8 KB · Views: 20
  • hood1.jpg
    hood1.jpg
    75.5 KB · Views: 19
  • side.jpg
    side.jpg
    98.2 KB · Views: 18

Latest posts

Forum statistics

Threads
44,149
Posts
950,365
Members
36,260
Latest member
Delirius63
Top