Removing instrument panel - dealing with the oil pressure line

Disclaimer: Links on this page pointing to Amazon, eBay and other sites may include affiliate code. If you click them and make a purchase, we may earn a small commission.

Chris64

Full Access Member
Joined
Sep 16, 2024
Posts
112
Reaction score
161
Location
San Diego
First Name
Chris
Truck Year
1974
Truck Model
K20
Engine Size
350
This is a strange thing that I haven't found any help on the internet at all.

It's a 1974 K-20.

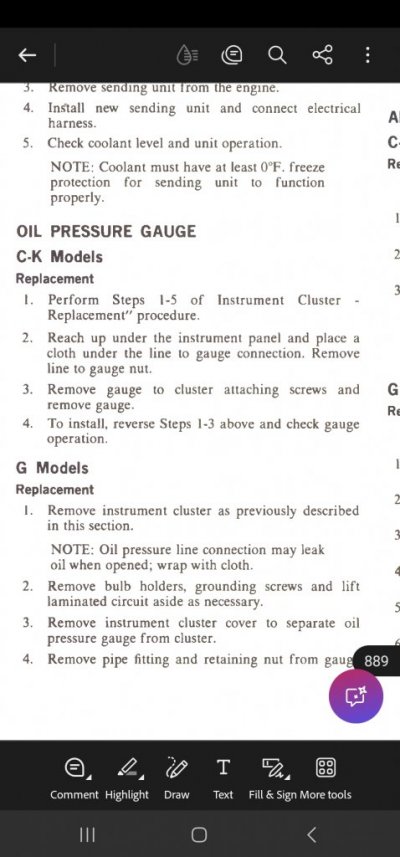
I was trying to remove the instrument panel and I'm not sure what to do with the oil pressure line. Everything I see online only talks about the speedo cable and the power harness, which are both relatively easy to disconnect. There's no way I can clearly disconnect the oil line going to the gauge and the connector in the engine bay is a long way away.

The reason I was trying to get in there was none of my dash lights were working. It turns out the flexi-surface was just oxidized and with a few twists of each light they slowly came back to life. That said, I may need to remove my entire dash to resolve another issue (I can still smell mouse in the AC ducts). That will require a full dash removal I think.
 

PrairieDrifter

Full Access Member
Joined
Dec 28, 2014
Posts
3,998
Reaction score
5,985
Location
North Dakota
First Name
Mason
Truck Year
84,79,77,76,70,48
Truck Model
Suburban k10, bonanza k10, k30, k20, c10, gmc 1/2ton
Engine Size
350, 350, 350, 350, 350, 350
You don't need to pull the cluster to work on the hvac. Everything should come out the bottom of the dash. May have to pull the bezel and dash pad though, I think the defrost vents bolt in.

The easiest way is to unhook the line is in the engine bay and pull it out with the cluster. Cap the end after removing to not make a mess. I've accessed all the light bulbs from under the dash, the high beam indicator is the worst one.

For the gauge lights I've found pulling the plugs, cleaning the contacts and bending them out slightly has worked great. I haven't replaced a circuit sheet yet. Gotta find a sweet spot sometimes.
 

75gmck25

Full Access Member
Joined
Oct 13, 2016
Posts
2,368
Reaction score
2,370
Location
Northern Virginia
First Name
Bruce
Truck Year
1975
Truck Model
K25 Camper Special TH350 NP203
Engine Size
5.7
I’ve always disconnected the oil line in the engine compartment. It’s not real hard to reach, and the two nuts for the compression fitting are usually accessible with a wrench.

I’ve been through just about all of my HVAC, and pulling the cluster is not usually needed.
- remove glove compartment door, then take out visible bolts on the A/C plenum and remove the cover. Clean out the mouse nest inside, and all the bolts, pencils and match books that have fallen inside.
Move heat door dash slider to make sure it has full travel in both directions. Adjust if needed.
Start the truck and then move the dash control to various positions to watch the blend door move back and forth when driven by the vacuum pods.

- directly above the transmission tunnel is another short plenum piece you can remove from the bottom, just to provide better visibility. It should give you visibility of the floor heat door, which just pivots up and down to control floor air flow.

- there is another plenum piece running from the drivers side vent over to the center of the dash. It has a short metal bracket bolted to the dash to keep it in place, and at each end I think it’s just pushed into the center plenum and the dash vent. It always takes a bit of playing to work it out of place, and feels like you might break something, but it does slip out.

As long as you are cleaning, you might also pull the dash pad, which gives you a good view of quite a bit behind the dash. There are four screws up above the glove compartment that hold the right side and there is a vent tube pushed onto the back of the far right dash vent . On the left it’s held by the dash bezel screws, so you just remove the plastic bezel. Then pull the pad directly toward you and it will slide out.
 

bucket

Super Moderator
Staff member
Super Moderator
Joined
Aug 3, 2010
Posts
31,100
Reaction score
30,355
Location
Usually not in Ohio
First Name
Andy
Truck Year
'77, '78, '79, '84, '88
Truck Model
K5 thru K30
Engine Size
350-454
I've always removed the oil line from the back of the cluster. I don't remember it being difficult, but it's been a number of years since I last did that.
 

RaisedK5

Full Access Member
Joined
Sep 12, 2021
Posts
123
Reaction score
257
Location
Memramcook, New Brunswick, Canada
First Name
Leland
Truck Year
1975
Truck Model
Blazer
Engine Size
350
Ya. Manual says just reach up behind and take off the nut.
 

Attachments

  • Screenshot_20250209_122234_Adobe Acrobat.jpg
    Screenshot_20250209_122234_Adobe Acrobat.jpg
    81.2 KB · Views: 7

Chris64

Full Access Member
Joined
Sep 16, 2024
Posts
112
Reaction score
161
Location
San Diego
First Name
Chris
Truck Year
1974
Truck Model
K20
Engine Size
350
I’ve always disconnected the oil line in the engine compartment. It’s not real hard to reach, and the two nuts for the compression fitting are usually accessible with a wrench.

I’ve been through just about all of my HVAC, and pulling the cluster is not usually needed.
- remove glove compartment door, then take out visible bolts on the A/C plenum and remove the cover. Clean out the mouse nest inside, and all the bolts, pencils and match books that have fallen inside.
Move heat door dash slider to make sure it has full travel in both directions. Adjust if needed.
Start the truck and then move the dash control to various positions to watch the blend door move back and forth when driven by the vacuum pods.

- directly above the transmission tunnel is another short plenum piece you can remove from the bottom, just to provide better visibility. It should give you visibility of the floor heat door, which just pivots up and down to control floor air flow.

- there is another plenum piece running from the drivers side vent over to the center of the dash. It has a short metal bracket bolted to the dash to keep it in place, and at each end I think it’s just pushed into the center plenum and the dash vent. It always takes a bit of playing to work it out of place, and feels like you might break something, but it does slip out.

As long as you are cleaning, you might also pull the dash pad, which gives you a good view of quite a bit behind the dash. There are four screws up above the glove compartment that hold the right side and there is a vent tube pushed onto the back of the far right dash vent . On the left it’s held by the dash bezel screws, so you just remove the plastic bezel. Then pull the pad directly toward you and it will slide out.
This is a good description of where I'm at now. Dash pad, glovebox and bezel removed. left and right plenum's removed.

Now I need to figure out the defrost ducts and anywhere else a mouse might have turned into a bathroom.
 

Latest posts

Forum statistics

Threads
44,795
Posts
968,404
Members
37,561
Latest member
IAMMC4
Top