Double Dingo's 1965 3/4 Ton "Crusty Biscuit"

Disclaimer: Links on this page pointing to Amazon, eBay and other sites may include affiliate code. If you click them and make a purchase, we may earn a small commission.

DoubleDingo

Full Access Member
Joined
Jul 3, 2012
Posts
11,325
Reaction score
17,372
Location
Right where I am
First Name
Bagoomba
Truck Year
1981
Truck Model
81-C20 Silverado Camper Special-TH400-4.10s
Engine Size
Carb'ed Vortec 350
I got to thinking yesterday about how the OD trans wouldn't shift into reverse after I pulled it from the truck. I forgot that I pushed in the lockout cable before detaching it from the transmission, and that is the reverse lockout and also engages the OD. So last night I turned the lockout lever on the transmission to the OD lockout position, which disengages the reverse lockout, and it shifted just fine into reverse. So the OD transmission is probably okay, just in need of a rebuild, and I have a feeling the PO not get the u-joints in time when he replaced them caused premature wear on the bearings. Glad I found it now instead of after the transmission grenaded.
 

Stewzer55

Full Access Member
Joined
Dec 4, 2013
Posts
2,243
Reaction score
66
Location
Ohio
First Name
Stew
Truck Year
1988
Truck Model
R30
Engine Size
350 TBI
That's a pretty steep OD. I picked up one of those 3 speed with OD transmissions for my uncle last year for my grandfather's 69 C10 with a 250, I think that has a 4.10 rear. I wonder how the 3/4 ton with coils rides compared to the 1/2, the 1/2 being very soft and comfortable.
 

DoubleDingo

Full Access Member
Joined
Jul 3, 2012
Posts
11,325
Reaction score
17,372
Location
Right where I am
First Name
Bagoomba
Truck Year
1981
Truck Model
81-C20 Silverado Camper Special-TH400-4.10s
Engine Size
Carb'ed Vortec 350
That's a pretty steep OD. I picked up one of those 3 speed with OD transmissions for my uncle last year for my grandfather's 69 C10 with a 250, I think that has a 4.10 rear. I wonder how the 3/4 ton with coils rides compared to the 1/2, the 1/2 being very soft and comfortable.

Yeah it's a 30% od, you know when it's engaged for sure. This 3/4 ton has all original coils and it rides really nice. A front sway bar would be a nice addition.

I know the tachometer the PO installed isn't reading right, with the straight 3 speed I have in the truck right now it's reading 2200 while doing 60-65, and I know that is not possible with 4:57's.

There's a few things I need to investigate like the temperature gauge wire, it reads pegged out hot blowing head gaskets hot, but it doesn't boil over. Checked the Shop Manual and it says there shouldn't be any sealant on the threads of the sending unit and this sending unit came with it, so I'm going to remove that and see if I get an accurate reading. There's no way changing the location of the sending unit from the intake to the head will cause the gauge to read down by C to buried into H.
 

DoubleDingo

Full Access Member
Joined
Jul 3, 2012
Posts
11,325
Reaction score
17,372
Location
Right where I am
First Name
Bagoomba
Truck Year
1981
Truck Model
81-C20 Silverado Camper Special-TH400-4.10s
Engine Size
Carb'ed Vortec 350
Pop and me rebuilt the od Trans yesterday, what a bitch. That thing fought us for 8 hours. It won't be an official write-up on everything we did with pictures of the whole process, but I will post up the pics I got about it tomorrow. It was a good learning experience since it was my first time. Can't wait to install it again with new bearings and such. Tried getting on here last night but only get G service up there and I didn't want to wait 10 minutes just to log in. Now getting ready to help move stuff for someone, good thing they're supplying steaks for dinner.
 

DoubleDingo

Full Access Member
Joined
Jul 3, 2012
Posts
11,325
Reaction score
17,372
Location
Right where I am
First Name
Bagoomba
Truck Year
1981
Truck Model
81-C20 Silverado Camper Special-TH400-4.10s
Engine Size
Carb'ed Vortec 350
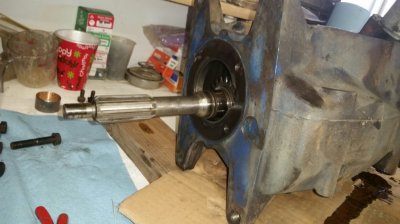
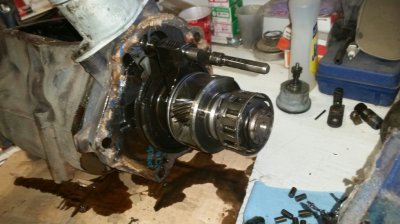
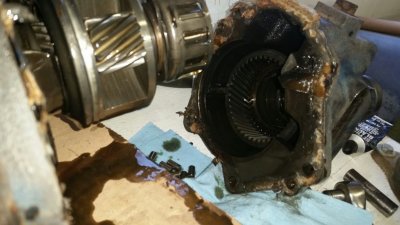
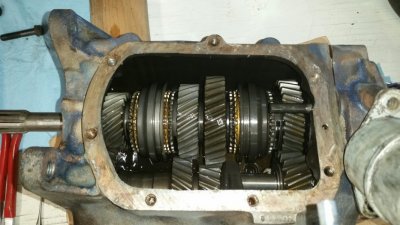
Okay, started off Saturday with the take down/disassembly of the OD Trans and everything went smoothly until after I cleaned everything and we went to take apart the cluster of bearings, gears, synchro's and brass rings. Replacing one of the bearings on that shaft took a good 45 minutes to get off of there. The one of the brass rings didn't fit well so it's going to be a little tight at first. Here's some pics of this project:

At the beginning of the tear down, no turning back now. Looking at the guts of the tranny you can't tell the all the main bearings are shot. Everything looked good. Then there are two angles of the sun, planets, and clutch cam of the OD. Definitely not your standard manual transmission tailshaft assembly.

From here it was off the spray all the parts down with brake kleen. There was some gunk in certain spots that was filled with metal shavings.
 

Attachments

  • -22Getting Started.jpg
    -22Getting Started.jpg
    95.9 KB · Views: 98
  • -22Tail Housing Removed.jpg
    -22Tail Housing Removed.jpg
    96.6 KB · Views: 96
  • -22Sun Planets and Clutch Cam.jpg
    -22Sun Planets and Clutch Cam.jpg
    95.7 KB · Views: 106
  • -22The Guts.jpg
    -22The Guts.jpg
    99.1 KB · Views: 103

DoubleDingo

Full Access Member
Joined
Jul 3, 2012
Posts
11,325
Reaction score
17,372
Location
Right where I am
First Name
Bagoomba
Truck Year
1981
Truck Model
81-C20 Silverado Camper Special-TH400-4.10s
Engine Size
Carb'ed Vortec 350
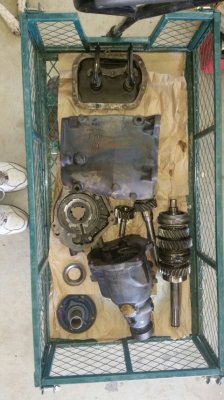
After getting everything cleaned up mom called us in for breakfast, she made breakfast pizza...man that was good. Back in the shop we got back to it, that's where the challenges and battles with the transmission began. The bottom cluster of gears was fine so we left it alone. Like I mentioned the bearing was a bitch to remove, and certain parts of the synchro's didn't want to cooperate, but after a long battle that all got fixed. Replacing the tailshaft bushing turned out to be a nightmare. It wouldn't cut in half without sliding all the way into the tailshaft housing, so we had to remove the plug on the top and then remove OD tailshaft gears that slide over the sun, planets and clutch cam. The plug you can see in the pic of the cleaned parts, it's the tan area on the tailshaft. That was actually a good thing because there was a new bearing for that, so I replaced it while it was apart. At this point it was around 4:30 pm and we still weren't done. In the pic of the clutch cam you can see what looks like needles on a blue towel. Those go into the slots on the clutch cam, and that is what engages and freewheels the overdrive. Each of those slots has a cam under it and when those "needles" are in the low spot it's freewheeling, and when power is applied they ride up on the cams and press against OD tailshaft gear. Those "needles" need to be glued in with grease and then the longest battle began. I thought my Pop was teaching me a lesson by watching fail for 2 hours, and I kept asking him what his lesson was. He to was dumbfounded as to why the tailshaft wasn't going on all the way. I could get those "needles" to slide half way in to the OD tailshaft and then it wouldn't slide on any more. No matter what I tried those "needles" would not go down to the low spot on their respective cams. Finally Pop locked the trans in gear and twisted it counterclockwise, and voila!, the tailshaft finally slid all the way on. By that point my back a knotted mess from bening over the bench trying to get that damn tailshaft on over and over. Got the tailshaft bolted down to the case, and then saw that they didn't provide any o-rings for the side cover shift arms. So I just bolted it on and loaded it in the back of the truck. At this point it was 8:30 pm and it's was getting dark.

Here's the rest of the pics I took of the project. It would have been nice to do a formal write up on this rebuild with pictures and everything, but I knew Pop wouldn't like that so I didn't bother taking pictures of every step.

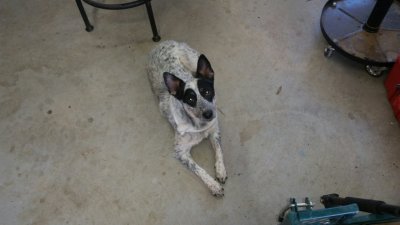
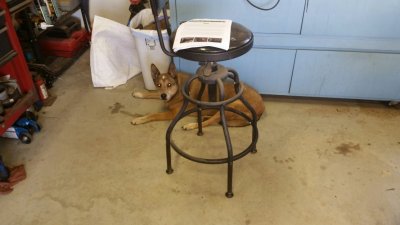
These are the all the parts after being cleaned. And my helpers. The blue queensland is Pepper, she just turned a year old in April. The red queensland that looks like a Dingo is my old girl Sybil, she is 13-1/2 and still pretty active for a senior dog.

Next up is to find o-rings for the side cover shift shafts, and seal the threads on the OD governor that goes on the passenger side of the tranny. Then I can swap it in and enjoy a rebuilt tranny.
 

Attachments

  • -22All Cleaned.jpg
    -22All Cleaned.jpg
    101.3 KB · Views: 131
  • -22Pepper.jpg
    -22Pepper.jpg
    93.2 KB · Views: 130
  • -22Sybil.jpg
    -22Sybil.jpg
    92.5 KB · Views: 113

DoubleDingo

Full Access Member
Joined
Jul 3, 2012
Posts
11,325
Reaction score
17,372
Location
Right where I am
First Name
Bagoomba
Truck Year
1981
Truck Model
81-C20 Silverado Camper Special-TH400-4.10s
Engine Size
Carb'ed Vortec 350
Almost forgot the mention the fun I had before leaving on Friday. I needed to swap in the factory driveline, change the alternator belt, check/set the timing, and get the wire ran to the temperature sending unit, and then clean off the transmission and load up. Sounds easy enough right?

Went to install the factory driveline I got out of the parts truck and had a new bearing installed on Wednesday. It is two solid shafts, and the only slider is into the tranny. I couldn't get it to slide in the tranny. Fought with it for a good 30 minutes before it finally bottomed out in the tranny. With this driveline design it eleiminates all of the slop the rear slider that the PO had in there. On the factory driveline there is a dish-shaped metal piece that is welded on the transmission-side of the carrier bearing, that will come into play later in the story.

I got the wire ran to the temperature sending unit. When I changed the intake for the quadrajet, I moved the sending unit to the head.

Now to change the alternator belt. The AC belt has to come off first and it wouldn't slide between the fan and shroud, so out with the battery, and off with the shroud. Now the alternator is replaced, and I noticed the charge wire is about to break. So I figure a new connector will fix that, yes and no. The nut was rusted to the stud and the stud wouldn't unscrew from the alternator. So instead of fighting any further I just replaced the alternator with the one from Mean Green. It is a high output type and it has a jumper wire from the positive post to the "F" terminal. Okay, what to do with the light blue wire that went to the "F" terminal, ah, just wrap it around and secure it on the loom until I can find out what it does. I was trying to be up to Mom and Pop's by 1 or 2. Got the alternator installed and all the the stuff bolted back in.

Now to check the timing. 8* BTDC. Not bad for doing it by ear, but 12* is better. I also found out I had the vacuum advance hooked up to the wrong port. Corrected that, and now the engine came to life. Adjusted the carburetor and decided to go get gas.

I pullout of the driveway and when I hit 2nd gear I hear a horrible sound coming from under the truck. I pulled over and looked it over. Couldn't see anything wrong. And then I remembered the metal dish by the carrier bearing. It was rubbing the bearing housing. CRAP! Of well, went and filled up and went back home. After a few more hours I got the transmission clean up and loaded in the truck, and then I crawled under to see if I could remedy the problem with the driveline. I was able to by lossening the bearing bolts and sliding it back a hair. No more grinding.

Called mom around 3pm to let her know I was leaving finally. So much getting up there by 2pm. So before I left town I see the temperature gauge is almost pegged to hot side. I asked myslef how could the engine run that much hotter now just because the sending unit is in the head and not the intake. I said screw it, I ran Mean Green hot like that and it never died so I took off up the canyon. When I shut it off up there it never boiled over and it didn't lose any coolant, so I have to chase down the sending unit wire and fix that.

One thing for sure, with the driveline being solid now, the truck drives a lot better. Not as hurky-jerky and it is way more responsive. And with the timing set to 12* and the vacuum advance on the correct port, the engine has way more power. It gets fairly decent mileage for having 4:57's in it. Should get even better with the OD engaged on the open road.
 

Stewzer55

Full Access Member
Joined
Dec 4, 2013
Posts
2,243
Reaction score
66
Location
Ohio
First Name
Stew
Truck Year
1988
Truck Model
R30
Engine Size
350 TBI
Pretty decent milage for a 4.57 gear is what, maybe 12-13mpg?
 

DoubleDingo

Full Access Member
Joined
Jul 3, 2012
Posts
11,325
Reaction score
17,372
Location
Right where I am
First Name
Bagoomba
Truck Year
1981
Truck Model
81-C20 Silverado Camper Special-TH400-4.10s
Engine Size
Carb'ed Vortec 350
12-13 would be really good. I didn't do an actual calculation, I just went by the gauge and how I was driving it. It seemed to use less than it did before in May when I went up on Mother's Day.

I got 14-16 in Mean Green. But it had HEI and 3:54s. So I should be able to get close to that with this truck once I get it dialed in.
 
Last edited:

Mr Clean

Super Moderator
Staff member
Super Moderator
Joined
Aug 18, 2010
Posts
10,374
Reaction score
10,460
Location
North East Texas
First Name
Shawn
Truck Year
1982 & 1985
Truck Model
K10 Extra Cab w/ Proper SWB, & 85 K5 Blazer
Engine Size
454 BBC, & 383 Stroker
I didn't read anything about the wiring being replaced, did I? If the wiring hasn't been replaced, I would chock up you gauge problem to BAD, OLD wire harness. Or it could be a bad gauge.

If I were you I'd go by a sold core wire, and gauge, and check it that way, just to see if the motor is truly running hot.

It sounds like your gauge is grounding out. Where do you have the wire running to from the head? Could you be getting a false reading because the wire might be to close to the header?

Do you have another gauge in your parts bin? It can only be a few things. Wire, Gauge, or the truck is running that hot.

Good job on the tranny, your better than me. I would have put a automatic in it. I only shift gears when I get paid for it. LOL
 

DoubleDingo

Full Access Member
Joined
Jul 3, 2012
Posts
11,325
Reaction score
17,372
Location
Right where I am
First Name
Bagoomba
Truck Year
1981
Truck Model
81-C20 Silverado Camper Special-TH400-4.10s
Engine Size
Carb'ed Vortec 350
No it's the original harness. I may have to re-route the wire and put some split loom over it. And I need to remove the sealant from the sending unit. I posted a photo I think back in June, I had just finished the quadrajet swap and I let it idle for 30 minutes in 106* heat, when I put a thermometer in the radiator cap hole. The coolant temp was 150*. If the gauge ends up being bad, I have a couple more gauges to try, and I kept the sending unit the PO had in there. If I end up chasing wiring issues other than this I'm going to remove the original harness and install the complete harness I had in Mean Green. The complete harness is continuous wire from fuse block to where it's terminated. Thus far this original harness is working well, so I really don't want to redo it. Although the complete harness is already setup for HEI, and has spare circuits so I can add the OD wiring if need be.
 

DoubleDingo

Full Access Member
Joined
Jul 3, 2012
Posts
11,325
Reaction score
17,372
Location
Right where I am
First Name
Bagoomba
Truck Year
1981
Truck Model
81-C20 Silverado Camper Special-TH400-4.10s
Engine Size
Carb'ed Vortec 350
Google is an awesome thing. Did some digging around to figure out what the "F" terminal is for on the alternator. I found out it is the exciter and the blue wire I didn't hook up goes to the "F" terminal on the the voltage regulator. I cannot recall if this new alternator has a built-in regulator, but what I've read about the exciter, is the wire to it should be connected as far away as possible so the alternator generates enough power to keep the battery output at 12.6 volts. Tonight I will hook up the blue wire to the alternator and see what happens.

And then to tackle the sending unit issue.
 

DoubleDingo

Full Access Member
Joined
Jul 3, 2012
Posts
11,325
Reaction score
17,372
Location
Right where I am
First Name
Bagoomba
Truck Year
1981
Truck Model
81-C20 Silverado Camper Special-TH400-4.10s
Engine Size
Carb'ed Vortec 350
Checked the temperature sending unit wire routing last night, and it was well clear of the exhaust. However, it was routed in an area under the engine that would be extremely hot no matter what. It was routed from the front of the driver's side head, down through the motor mount, and then snaked up to the back of the engine from a clip that holds the taillight/brake light wires. It's closest point to any exhaust manifold was maybe 3-4 inches, except right at the sending unit itself. I did it like that thinking it would be far enough away from the heat sources, not even thinking about the saturation of heat blowing through that area even going down the road. Heat from the engine and exhaust on each side, and then all that heat collecting and heating up the wire substantially there at the bottom side of the firewall. So I routed it along the top of the block like before, only took it down the front and looped it back up to the sending unit from the bottom. It made more sense; even though the engine will be just as hot on the top, there won't be any heat saturation up there because the fan is blowing air across it. If that doesn't work then I'll mess with the sending unit and maybe chase the wire to the bulkhead plug and replace it from there to the sending unit.

Got the alternator wiring fixed up. I need to redo the routing of wiring that the PO had done. Some of what he did doesn't bother me, but other stuff does, like tying the spark plug wires to the truck's wiring harness. Time to replace the spark plugs and spark plug wires anyhow.

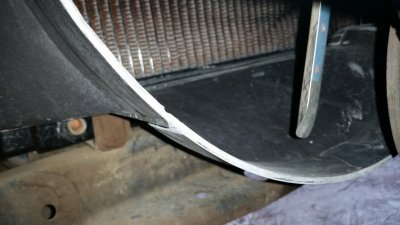
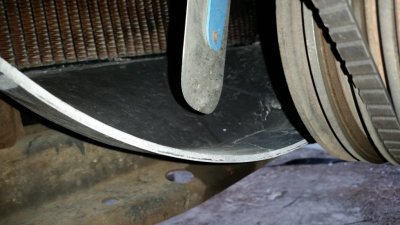
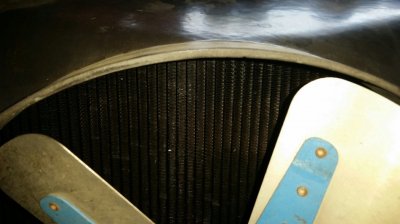
Another thing I started but couldn't finish because it got too dark, was the misaligned shroud in relation to the fan. Check out how close the top was to the fan and how much room there was at the bottom, I'm lucky the motor mounts and bellhosuing mounts are stiff, or that shroud would be toast. Drilled some new holes, but the way the shroud is made, it won't slide up far enough. It catches on the metal along side the radiator. Tonight I'll dremel some slots in the bottom so it will slide up enough to bolt in. From the initial check before drilling the new holes, I got the fan to shroud spacing about as even as one could, a finger's width top and bottom. Much better that about <1/4" top and 1-2" bottom.

Another thing I checked was the crank pulley to water pump pulley ratio to make sure the water pump was turning fast enough. The crank pulley is bigger diameter than the water pump pulley so the water pump isn't being under driven, it is actually spinning faster than the crank. Coolant is definitely getting pushed through the system at a sufficient rate. The PO did mention using straight coolant when I first went to look at it, he said water is poison to an engine. So the water/coolant ratio may be more than 50/50 even after draining some of it out when replacing the intake. I think a good flush of the system and adding the correct ratio back into the system will help. I'll do that when I change the upper and lower hoses along with the heater hoses.
 

Attachments

  • -18Fan-Shroud 01.jpg
    -18Fan-Shroud 01.jpg
    91.1 KB · Views: 104
  • -18Fan-Shroud 02.jpg
    -18Fan-Shroud 02.jpg
    94.6 KB · Views: 123
  • -18Fan-Shroud 03.jpg
    -18Fan-Shroud 03.jpg
    95.3 KB · Views: 99

DoubleDingo

Full Access Member
Joined
Jul 3, 2012
Posts
11,325
Reaction score
17,372
Location
Right where I am
First Name
Bagoomba
Truck Year
1981
Truck Model
81-C20 Silverado Camper Special-TH400-4.10s
Engine Size
Carb'ed Vortec 350
The other night I was going through my middle shed and dug out the factory AC parts that were in Mean Green. The heater box, AC box that mounts under the glove box, ducting, etc. I need to dig up the control levers and push/pull controls. I have new control cables and flexible ducting for it. I need to get some pics of all that stuff. I may have found all the mounting information too from the Assembly Manual and the Shop Manuals.
 

Stewzer55

Full Access Member
Joined
Dec 4, 2013
Posts
2,243
Reaction score
66
Location
Ohio
First Name
Stew
Truck Year
1988
Truck Model
R30
Engine Size
350 TBI
Straight antifreeze? I don't think that's particularly good for the engine either.
 

Latest posts

Forum statistics

Threads
44,416
Posts
957,110
Members
36,752
Latest member
78 squarebody
Top