Bench seatback foam from LMC - anyone else installed it?

Disclaimer: Links on this page pointing to Amazon, eBay and other sites may include affiliate code. If you click them and make a purchase, we may earn a small commission.

75gmck25

Full Access Member
Joined
Oct 13, 2016
Posts
2,409
Reaction score
2,450
Location
Northern Virginia
First Name
Bruce
Truck Year
1975
Truck Model
K25 Camper Special TH350 NP203
Engine Size
5.7
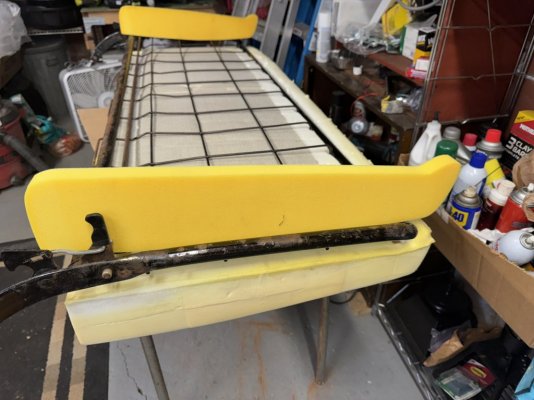
I ordered the 73-80 bench seam foam and tan seat cover from LMC, and today I started stripping down the seatback.

When I unboxed the foam I found that the foam for the seatback was three pieces - the main cushion and an add-on piece for each end. Called LMC and they said that the added pieces were probably there in case you needed them to fill out the upholstery, but I could tell they were just guessing. Then I measured the old vs. new foam, and you definitely need those two pieces to get the seatback to the right length. Those added pieces also seem to be a little more firm than the rest of the seatback.

It's just strange that there are no directions, so I thought someone else might have gone through the same installation. Picture below shows what I am talking about.
 

Attachments

  • IMG_9804.jpeg
    IMG_9804.jpeg
    122 KB · Views: 22

Tonimus

Full Access Member
Joined
Sep 17, 2024
Posts
198
Reaction score
367
Location
Phoenix
First Name
Tony
Truck Year
1978
Truck Model
C10 Suburban
Engine Size
454
Is it a different density than the main section? Other than that, I don't know why there'd be separate sections.
 

75 Chevy SWB 4x4

Supporting Member
Supporting Member
Joined
Mar 10, 2025
Posts
26
Reaction score
32
Location
NE Oregon
First Name
Doug
Truck Year
1975
Truck Model
K10 4x4
Engine Size
350
I was wondering about their seat foam kit. I need to redo my stock bench seat with new foam and seat covers.

Keep us updated with your progress, and how much of a PITA it is do.
 

75gmck25

Full Access Member
Joined
Oct 13, 2016
Posts
2,409
Reaction score
2,450
Location
Northern Virginia
First Name
Bruce
Truck Year
1975
Truck Model
K25 Camper Special TH350 NP203
Engine Size
5.7
I got the seat back and cushion foam installed, along with new original design set cover.
I apologize for the long answer. :)

Seat back - original foam has two metal rods embedded in the back side, running across the foam. Hog rings were used to attach the seat frame to the rods in the foam, so they were tied together well.
- New foam had only a wide section of stiff fabric embedded in the back of the foam, so I used hog rings through that fabric to attach the foam to the frame. Not real sturdy, but it worked to keep them together.
- The two end pieces I asked about were needed to make the foam the right length to fill out the seat cover, but there was no way to keep them in place while you pulled on the cover. I finally just tied twine around the entire seat and the end pieces to keep them together, and later cut the twine and pulled it out.
- Based on an LMC video suggestion, I slipped 39 gallon garbage bags over the seat frame and foam from each end, and taped them together with painters tape. Now it was a single assembly with very smooth surface.
- Then I turned the cover inside out and slid about 4-5 inches of it down over the top of the seat until it was fully in place. After that I slowly turned the cover back so that the right side was out, and gradually pulled it down the seat. Once fully in place I could reach up my hand to work on uneven spots to make sure the cover was smooth on the foam. Carefully pulled out the garbage bags I has slipped over the assembly.
- Then I pulled it all down fully and used the hog rings to secure the bottom around the rod in the seatback frame. It took one of us pulling the cover down and one using the hog rings to secure it, so it’s definitely tight.

Seat bottom cushion and new cover - what a PIA!
First I crimped and welded a couple of the seat frame springs that were broken.
New cushion was much taller than the old one and not collapsed, so I knew it would be hard to pull on.
- first attempt I never got it on completely. One seam on the front lower side split open from the strain on the threads. The horizontal reinforcement, which is a nylon rod sewn into the bottom edge of the seat cover, does not go all the way around to support the left and right vertical seams, so they are vulnerable to tearing.
- Took the cover off and worked with my wife to sew and reinforce the seam.
- Then went to the lower back edge of the seat cover and cut a vertical slit up from the bottom about 3-4” so I would have more slack at the bottom when slipping it on. I assumed I could then pull and close up the gap after it was installed.
- Pulled the cover back on over the cushion and managed to work it all down it place. But discovered that the gap from the slit I made in the back side would not completely close. However, I could hog ring everything in place (very secure) and just have a short section of the frame showing in the back. Since I still did not like the look, I cut a short piece out of the old seat cover vinyl and used fabric glue to put it under the edge of the new cover and over the bare frame area. It’s not real pretty, but nobody will ever see it unless they remove the seat.
 

75 Chevy SWB 4x4

Supporting Member
Supporting Member
Joined
Mar 10, 2025
Posts
26
Reaction score
32
Location
NE Oregon
First Name
Doug
Truck Year
1975
Truck Model
K10 4x4
Engine Size
350
WOW! That definitely sounds like a huge PITA!

But once it's done, is has to be a very rewarding and satisfying experience to have it look and feel better than new when sitting on the seat now.
 

Latest posts

Forum statistics

Threads
45,145
Posts
976,192
Members
38,103
Latest member
junk10
Top