Poor Man Valve Job

Disclaimer: Links on this page pointing to Amazon, eBay and other sites may include affiliate code. If you click them and make a purchase, we may earn a small commission.

HotRodPC

Administrator
Staff member
Admin
Joined
Aug 29, 2010
Posts
47,132
Reaction score
9,327
Location
OKC, OK
First Name
HotRod
Truck Year
85 K20 LWB
Truck Model
Silverado
Engine Size
454 - Turbo 400 - 3.73
Been awhile since I did a write up. Watching a Walking Dead marathon on TV, what better time to tear down a head???

This is actually quite a bit of work for what you get out of it, but if you're bored and/or don't have cash to pay a machine shop for a complete valve job...

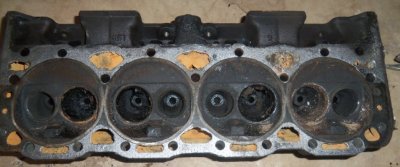
This one of the used heads of the set I bought for $40 to patch up the 91 Burb. That motor has 219,000 miles, so even though it runs good for now, I don't see it worthy of a total valve job. It had been overheated and at least blew a head gasket. Knowing the heads are notorious for cracking, I'm just assuming the worst and bought a set of used heads said to be off of a 92 Chevy truck and the guy seems to think it may have only had 82,000 miles on it. You'll see after I show the pics, I tend to disagree and it's many more than 82,000.

attachment.php
 

HotRodPC

Administrator
Staff member
Admin
Joined
Aug 29, 2010
Posts
47,132
Reaction score
9,327
Location
OKC, OK
First Name
HotRod
Truck Year
85 K20 LWB
Truck Model
Silverado
Engine Size
454 - Turbo 400 - 3.73
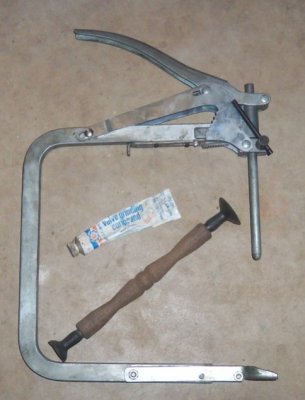
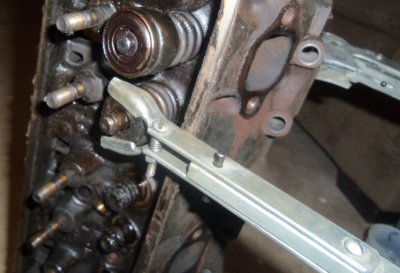
My handy dandy valve spring compressor. Valve Lapping tool which I rarely use, since I gently tighten down the chuck on a cordless drill, and valve grinding compound.

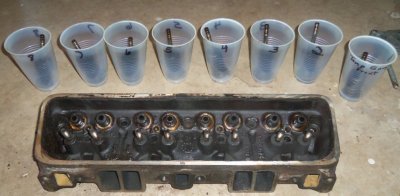
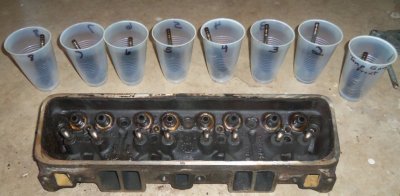
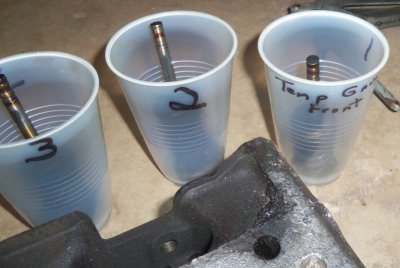
And a completely disassembled head with all the parts in marked cups. Very important to mark every part and put it back together, EXACTLY as it came apart.
 

Attachments

  • PoorManVJ 004.jpg
    PoorManVJ 004.jpg
    49.2 KB · Views: 96
  • PoorManVJ 006.jpg
    PoorManVJ 006.jpg
    91 KB · Views: 86
  • PoorManVJ 008.jpg
    PoorManVJ 008.jpg
    90.6 KB · Views: 83
  • PoorManVJ 009.jpg
    PoorManVJ 009.jpg
    57.6 KB · Views: 101
  • PoorManVJ 019.jpg
    PoorManVJ 019.jpg
    99.6 KB · Views: 100

HotRodPC

Administrator
Staff member
Admin
Joined
Aug 29, 2010
Posts
47,132
Reaction score
9,327
Location
OKC, OK
First Name
HotRod
Truck Year
85 K20 LWB
Truck Model
Silverado
Engine Size
454 - Turbo 400 - 3.73
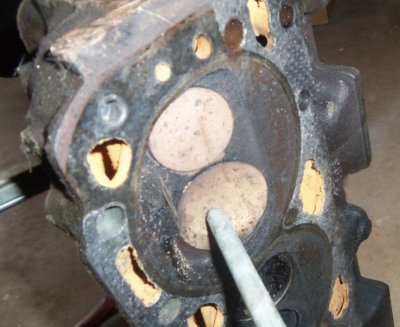
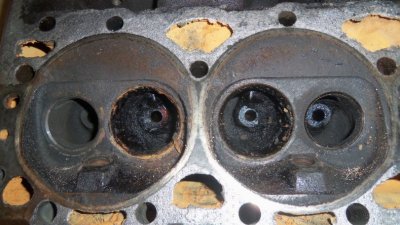
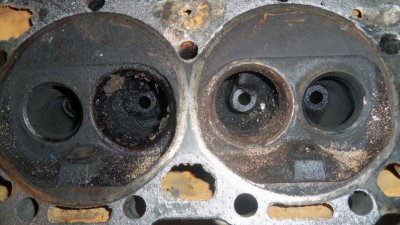
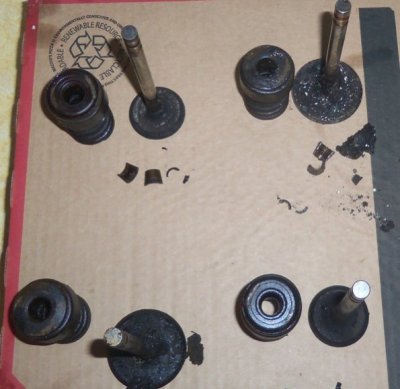
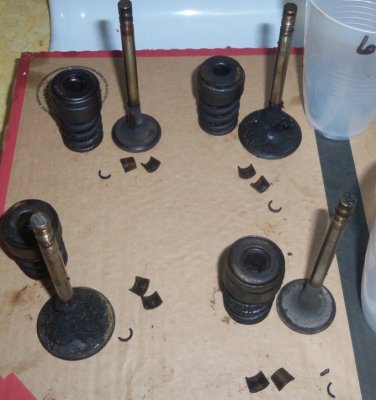
I'm not seeing any cracks in this head so far, but obviously it's filthy as all hell. Not even sure what this guy was running in this motor or how rich it is running but damn, it's dirty dirty dirty and gunk build up on the Intake valves is about as worse as I've seen in the past even on a Carbed leaded gas engine.
 

Attachments

  • PoorManVJ 011.jpg
    PoorManVJ 011.jpg
    97.4 KB · Views: 105
  • PoorManVJ 014.jpg
    PoorManVJ 014.jpg
    101.5 KB · Views: 105
  • PoorManVJ 015.jpg
    PoorManVJ 015.jpg
    101.3 KB · Views: 112
  • PoorManVJ 019.jpg
    PoorManVJ 019.jpg
    99.6 KB · Views: 117
  • PoorManVJ 017.jpg
    PoorManVJ 017.jpg
    93.3 KB · Views: 94

HotRodPC

Administrator
Staff member
Admin
Joined
Aug 29, 2010
Posts
47,132
Reaction score
9,327
Location
OKC, OK
First Name
HotRod
Truck Year
85 K20 LWB
Truck Model
Silverado
Engine Size
454 - Turbo 400 - 3.73
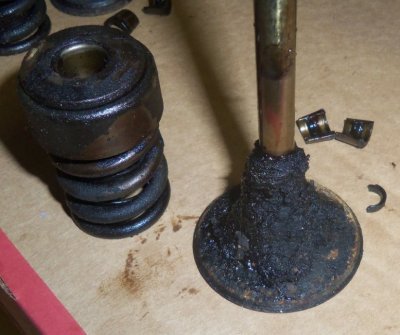
I'll be posting some pics of the valves. They intakes are horrid. The valve seals are hard and brittle as rock. They came off in pieces. I'm glad I decided to do this now after seeing how dirty they are and the valve seats too. Cleaning up the seats and new seals will make a hell of a difference compared to how these would have ran without doing anything. Next is to get some oven cleaner to soak the head, then take it to the car wash next trip outta the house. I could soak it in my solvent but not so sure my solvent is strong enough to get these clean. I'd really like to bake them or take to a machine shop for cleaning and I might depending on the expense.
 

89Suburban

Supporting Member
Supporting Member
Joined
Dec 7, 2010
Posts
24,809
Reaction score
6,738
Location
Southeast PA
First Name
Paw Paw
Truck Year
2007
Truck Model
Chevrolet Tahoe LT
Engine Size
5.3, 4WD
**** yeah!!! :popcorn:
 

HotRodPC

Administrator
Staff member
Admin
Joined
Aug 29, 2010
Posts
47,132
Reaction score
9,327
Location
OKC, OK
First Name
HotRod
Truck Year
85 K20 LWB
Truck Model
Silverado
Engine Size
454 - Turbo 400 - 3.73
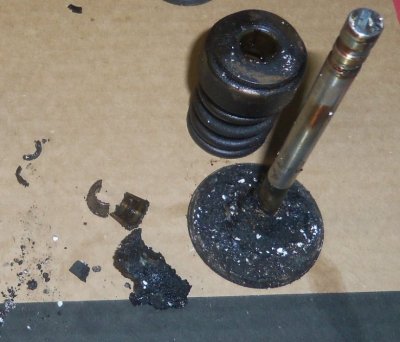
For your viewing pleasure, here are some pics of the valves.


See that big chunk? That was attached to the valve, you can almost tell right where it was stuck to the valve. Yep, the valve seals are hard as a rock and brittle as hell. Glad I have plenty of those around from rebuilding past engines and saving the left over gaskets from the kits.
 

Attachments

  • PoorManVJ 020.jpg
    PoorManVJ 020.jpg
    57.7 KB · Views: 96
  • PoorManVJ 022.jpg
    PoorManVJ 022.jpg
    92.9 KB · Views: 86
  • PoorManVJ 025.jpg
    PoorManVJ 025.jpg
    76.6 KB · Views: 109
  • PoorManVJ 026.jpg
    PoorManVJ 026.jpg
    94.1 KB · Views: 119

bucket

Super Moderator
Staff member
Super Moderator
Joined
Aug 3, 2010
Posts
30,620
Reaction score
28,869
Location
Usually not in Ohio
First Name
Andy
Truck Year
'77, '78, '79, '84, '88
Truck Model
K5 thru K30
Engine Size
350-454
Holy crap! 82K maybe if every last mile was spent idling in traffic.
 

89Suburban

Supporting Member
Supporting Member
Joined
Dec 7, 2010
Posts
24,809
Reaction score
6,738
Location
Southeast PA
First Name
Paw Paw
Truck Year
2007
Truck Model
Chevrolet Tahoe LT
Engine Size
5.3, 4WD
Lmao!!! :lol: :laughing1: :happy175:
 

HotRodPC

Administrator
Staff member
Admin
Joined
Aug 29, 2010
Posts
47,132
Reaction score
9,327
Location
OKC, OK
First Name
HotRod
Truck Year
85 K20 LWB
Truck Model
Silverado
Engine Size
454 - Turbo 400 - 3.73
I know the valve seals are horrible. The guides seem to be OK. Not the best but OK. I can feel a little vacuum dragging the valve out of the guide, so they can't be to awfully loose. I guess oil could have been still riding down the valve stems as bad as the seals were. I'm thinking more like 150,000 - 180,000 miles.
 

chevyk10

Full Access Member
Joined
Jan 31, 2014
Posts
358
Reaction score
6
Location
WV
First Name
Daniel
Truck Year
1984 chevy
Truck Model
k-10
Engine Size
358 Dart block with aluminum heads 430hp/450ft-lb torque
Are those guides tight? Those water jackets look like hell. I'd definitely cook that SOB. Going to be hard to poor boy those and get them decent.


Sent from my iPhone using Tapatalk
 

HotRodPC

Administrator
Staff member
Admin
Joined
Aug 29, 2010
Posts
47,132
Reaction score
9,327
Location
OKC, OK
First Name
HotRod
Truck Year
85 K20 LWB
Truck Model
Silverado
Engine Size
454 - Turbo 400 - 3.73
Are those guides tight? Those water jackets look like hell. I'd definitely cook that SOB. Going to be hard to poor boy those and get them decent.


Sent from my iPhone using Tapatalk

yes, the guides seem to be in fair to good shape. Good enough for poor man vavle job. You're new, you don't know me very well yet. Things don't work until I say they don't work. They'll work close to new when I'm done. Won't last another 20 years or 100,000 miles, but they'll work just fine for the motor they're going on. :waytogo:
 

chevyk10

Full Access Member
Joined
Jan 31, 2014
Posts
358
Reaction score
6
Location
WV
First Name
Daniel
Truck Year
1984 chevy
Truck Model
k-10
Engine Size
358 Dart block with aluminum heads 430hp/450ft-lb torque
Cool


Sent from my iPhone using Tapatalk
 

chengny

Full Access Member
Joined
Feb 22, 2012
Posts
4,084
Reaction score
1,024
Location
NH
First Name
Jerry
Truck Year
1986
Truck Model
K3500
Engine Size
350/5.7
Next is to get some oven cleaner to soak the head, then take it to the car wash next trip outta the house. I could soak it in my solvent but not so sure my solvent is strong enough to get these clean. I'd really like to bake them or take to a machine shop for cleaning and I might depending on the expense.

This will probably drive the purists nuts but here goes:

1. Get the bulk of the caked on grease and oil using ZEP heavy duty oven cleaner and a couple of toothbrush sized wire brushes. Preheat the heads to 200F - the stuff works so much better when applied to warm steel. After a couple of applications they will look pretty good but there will still be some pockets of carbon that are nearly impossible to get clean with chemical/mechanical methods.

2. If you have access to an electric oven with a self-cleaning feature - throw the heads in and run the self clean cycle. Do it a couple of times if necessary. Wash away any remaining carbon with a strong stream of water or blow away with compressed air (it will have turned to a light ash in the oven).

They will come out like new. Cast iron is stable up to about 2000F and its melting point is well over that. So you can feel safe exposing them the temps used in the self cleaning cycle (about 900F). Exhaust gases run about 2000 degrees and they handle that fine.
 

HotRodPC

Administrator
Staff member
Admin
Joined
Aug 29, 2010
Posts
47,132
Reaction score
9,327
Location
OKC, OK
First Name
HotRod
Truck Year
85 K20 LWB
Truck Model
Silverado
Engine Size
454 - Turbo 400 - 3.73
I've sprayed it down with Purple Power straight and let that soak. Then I intended to do the Oven Cleaner and car wash. Then reevaluate after that and see what I got. I don't want to spend to much doing it with chemicals when for $20 my machinist might do them both.

I've been looking for a trash Electric Self Clean oven for ever to put in the garage for my trans cases and engine parts along with powder coating. No such luck yet. Figured I'd find one that someone got filthy dirty and burnt up burners and maybe a bad heating element and I could fix the over part and make it work. I already have 220 out in the garage for it.
 

chengny

Full Access Member
Joined
Feb 22, 2012
Posts
4,084
Reaction score
1,024
Location
NH
First Name
Jerry
Truck Year
1986
Truck Model
K3500
Engine Size
350/5.7
My handy dandy valve spring compressor. Valve Lapping tool which I rarely use, since I gently tighten down the chuck on a cordless drill, and valve grinding compound.

I have lapped in a lot of valves in my time (all steam valves but the same fundamentals apply). Is it okay if I offer some tips to a successful valve grind/lap-in?

1. Most important is to maintain the same relative angle between the the disc and seat during the lapping as will be found when the two parts are finally assembled. Ideally this is accomplished by basically assembling the valve - in a loose enough manner that the disc can still be turned against the face of the seat . In the case of cylinder head valves this is easily accomplished by inserting the valve stem into the head. The valve guide/bore will provide the constant alignment required at the seat to disc interface. If this alignment is not maintained during the grind, the sealing faces will not be true to each other and will leak under pressure.

2. Some length of the valve stem will protrude from the top of the guide. This is a convenient place to attach whatever tool is used to provide the rotating motion necessary to effect the procedure. A wrap of tape around the stem will protect the surface and help provide a grip for the chuck.

3. It is always best to grind in a valve to it's seat using an oscillating motion rather than a constant grind in one direction. The text book method is to rotate the disc back and forth approximately 90 degrees. This is done until the bulk of the grinding/lapping compound has been squeezed out from between the 2 surfaces. The disc is then raised from the seat sufficiently to allow re-application of the displaced compound or the application of a fresh coating. The next round of grinding should be 90 degrees off from the previous one.

Although it sounds like you have decided to use a drill be sure to change direction frequently. The reason for this is to prevent setting up a "record groove" pattern on the surfaces. In a high pressure steam valve application, the steam will quickly find a path to leak by and the seat will soon be cut.

4. Take care that once you match up a disc with a seat, they stay together from then on. It is similar to the relationship that develops between a flat tappet and it's native cam lobe during the break in process- though not nearly as critical.

5. Start with a coarse grade of compound to quickly remove the highest points on the irregular faces of the disc/seat. Switch to a medium grade to smooth out any grinding marks made by the coarse compound. Finish with a fine grade to polish the faces and allow for final inspection. Prussian Blue is used to check for a perfect seal. Refresh the compound often during the process - the abrasive grit breaks down with use and looses it's cutting ability. Wash away all traces when done.

6. To check for tightness of the sealing surfaces after assembly, place a large piece of gasket material on the workbench, lay the head on the gasket and clamp it down. Apply air pressure via the spark plug hole and spray soap suds into the intake/exhaust ports. Mark the leaking valves and re-lap.

For a quick check, I just flip the heads over and fill the domes with PBlaster. If it's still there in the morning - the valve are tight enough for me.
 
Last edited:

Latest posts

Forum statistics

Threads
44,416
Posts
957,123
Members
36,753
Latest member
TheRigLivesOn
Top