Cab leaking

Disclaimer: Links on this page pointing to Amazon, eBay and other sites may include affiliate code. If you click them and make a purchase, we may earn a small commission.

Joined
Mar 27, 2023
Posts
40
Reaction score
13
Location
Richmond, VA
First Name
Andrew
Truck Year
1987
Truck Model
R10
Engine Size
305
Ok folks, I have cleared debris from the wheel wells, sealed the ridiculous, two layer firewall and everything else I can think of and the cab still leaks into the driver and passenger side floors. I have brand new carpet and insulation and now I am back to square one. Do I just need to friggin duct tape a blue tarp all across the hood?
 

JamesSam

Full Access Member
Joined
Feb 15, 2023
Posts
1,454
Reaction score
4,011
Location
VA
First Name
Sam
Truck Year
1987
Truck Model
Silverado V10
Engine Size
5.7 L 350 v8
This happens in my truck on the drivers side. It seems to land right under where the parking brake lever is. I believe it comes from the cowl. Notorious to happening to squares. Look there for another spot you can fill. I believe @AuroraGirl has put info up on here about this before.
 

dsteelejr

Full Access Member
Joined
May 25, 2020
Posts
237
Reaction score
229
Location
Hudson, WY
First Name
David
Truck Year
1973, 1980
Truck Model
Cheyenne super C20 camper special, Sierra K25
Engine Size
350, 454
My ‘80 K25 has the same problem, drips over the fuse block. One of the fuse block bolts has some surface rust from it. I was thinking of caulking it until the day I remove the cab for restoration bc I have a few holes in the floor in the usual places too.
 

Old Guy Bill

Full Access Member
Joined
Sep 10, 2023
Posts
398
Reaction score
1,225
Location
KY
First Name
Bill
Truck Year
1978
Truck Model
K20
Engine Size
400
In the bottom corner of the windshield channel on each side there is a small drain hole, it’s under the gasket. If this hole is blocked with debris or sealants the water will back up and get in between the two pieces of the windshield flange.
 

Radiohead

That guy on the Columbia
Joined
Mar 17, 2022
Posts
2,309
Reaction score
7,458
Location
Low Earth Orbit where it's safer
First Name
Eric
Truck Year
MCMLXXIX
Truck Model
C-20 Silverado Camper Special
Engine Size
454 crazy cubes, or 7.4 luscious litres
Don't forget to look up. I was surprised/disappointed when I found this
You must be registered for see images attach

I'm sure I have cowl issues too, because I have the rusty fuse panel and rotted out parking brake cable & lever assembly too. All this to say its not always what you might expect. GL, but let us know what and how you fixed it. Pics are cool too.
 

gmbellew

Full Access Member
Joined
May 27, 2018
Posts
1,158
Reaction score
1,183
Location
Kansas city
First Name
glen
Truck Year
1990
Truck Model
suburban 1500
Engine Size
350
under the truck behind the fenders are the cowl drain exits. you may need to remove a plastic cover to see them. but you need to pull debris, flush from top, pull debris, and repeat until all the debris is removed. both sides.
 
Joined
Mar 27, 2023
Posts
40
Reaction score
13
Location
Richmond, VA
First Name
Andrew
Truck Year
1987
Truck Model
R10
Engine Size
305
Ok folks, I have cleared debris from the wheel wells, sealed the ridiculous, two layer firewall and everything else I can think of and the cab still leaks into the driver and passenger side floors. I have brand new carpet and insulation and now I am back to square one. Do I just need to friggin duct tape a blue tarp all across the hood?
Update! I have decided for the time being to just JB Weld the screw holes for the kick plates over. It has been effective. They were seeping quite a bit. I also have a very slow drip by the heater box or whatever behind the glove compartment. Of course that one looks like it is beyond my time and capabilities. I also notice that the cowl drains really well but….on the passenger side, way up top, in that big well of space, there is a drip. It happens to drip right over the lip of that hole that the vent door sits in. I don’t know what to seal on the outside to stop this but from the inside will be impossible. I just want to seal that whole thing up. In the meantime it is easy to monitor with the kick plates off. If I can just stop the leak I will be happy and can find a different way to fasten the kick plates on, even if velcro.
 

gmbellew

Full Access Member
Joined
May 27, 2018
Posts
1,158
Reaction score
1,183
Location
Kansas city
First Name
glen
Truck Year
1990
Truck Model
suburban 1500
Engine Size
350
if water is sweeping in the kick plates, make sure you clean any debris from the cowl drain exit that is behind the front fender...when debris collects in that area, it builds up water faster than it can drain out and it will seep in the kick plate area.
 
Joined
Mar 27, 2023
Posts
40
Reaction score
13
Location
Richmond, VA
First Name
Andrew
Truck Year
1987
Truck Model
R10
Engine Size
305
if water is sweeping in the kick plates, make sure you clean any debris from the cowl drain exit that is behind the front fender...when debris collects in that area, it builds up water faster than it can drain out and it will seep in the kick plate area.
Thanks! Yeah those are super clear. Flowing nicely. I also find a damn wasp’s nest up in there today too. The drip from above is going to be tough to locate/fix.
 

saltdog

Supporting Member
Supporting Member
Joined
Aug 9, 2020
Posts
55
Reaction score
62
Location
US
First Name
Mike
Truck Year
1983
Truck Model
K20 Suburban
Engine Size
350
Pull the wipers and cowl and check the seam between firewall and dash - they will always leak there. Get it super clean and prime it, paint it, let dry, then seal it up. Flexseal worked great for me
 
Joined
Mar 27, 2023
Posts
40
Reaction score
13
Location
Richmond, VA
First Name
Andrew
Truck Year
1987
Truck Model
R10
Engine Size
305
Hi Everyone!

So, I finally have an update on my leaky kick panels. Both panels have been off for sometime now. I JB welded every screw hole over and tested heavy water flow. Things looked ok.

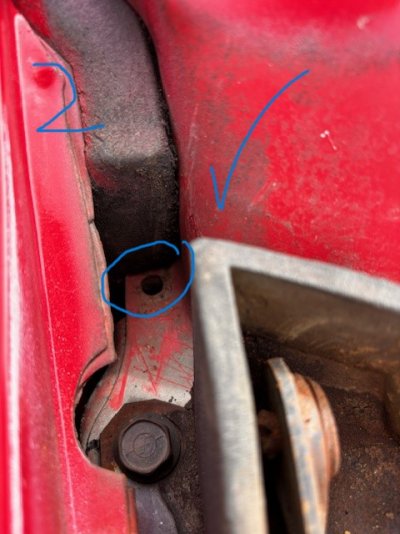
In picture two, that is the drain hole many have mentioned on this forum. I ran a coat hanger all the way down and worked it in and out to ensure debris is gone.
The drain hole on the other side was interesting because it was covered by that rubber insulation you see also in picture 2. I mean totally covering the whole. I had to cut some of it out to uncover the hole. Also did the coat hanger in that one too. But I think this was probably affeecting my driver side.

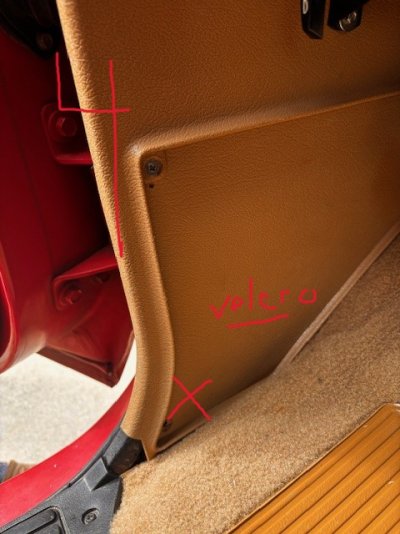
In picture 3, you can see that I redrilled the two holes in the metal being the molding where you see the blue circles. My logic is that it's away from the flow of the water from the cowl and would be safe. I also used nylon tape around the screw threads and screwed it in slowly. I also filled the holes with 100% silicone before I installed the screws. I repeated this process for the two screws that hold the hood latch release. I didn't redrill any other holes. Instead, I used heavy duty velcro on the sheet metal and the corresponding area on the plastic trim to further fasten it. I feel a lot better having all of the holes toward the front of the truck welded over.

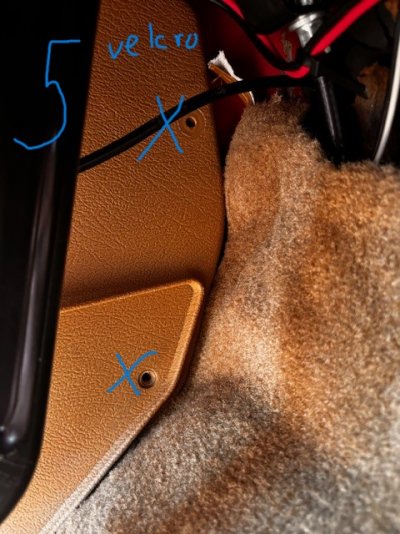
In picture 4, you can see the holes I chose not to redrill or screw. Velcro is also behind those spots. I figure it also makes it easier to get this piece off in the event of more leaks. I plan on grinding down some screws and just glueing the cap part in the holes to make it look more finished.

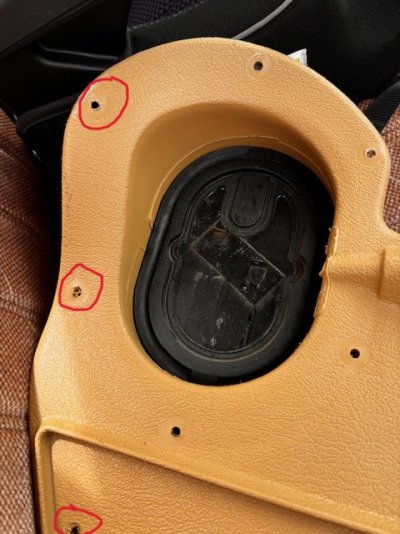
Picture 6 is your passenger side and it sucks. I ran water down the cowl and any hole you see circled in red seeps pretty badly. So far, I have JB welded the one at the bottom up again because it was the worst. I still have some decisions to make on how to finalize the passenger side. My AC seems to run better with that air flow door but I can't see how I can ensure it doesn't leak. I definitely need a new oval rubber seal on the back of what you see. But my concern is still those holes circles in red. I could use nylon thread tape on the screws there and 100% silicone also but I'm just not sure. In order to get that rubber seal to seat properly, I will need to have all screws firmly installed. I am not going to redrill any of the holes down by the floor and will repeat my velcro plan there.
 

Attachments

  • 2.jpg
    2.jpg
    80.9 KB · Views: 12
  • 3.jpg
    3.jpg
    44.8 KB · Views: 12
  • 4.jpg
    4.jpg
    88 KB · Views: 13
  • 5.jpg
    5.jpg
    111.6 KB · Views: 11
  • 6.jpg
    6.jpg
    105.5 KB · Views: 13

Forum statistics

Threads
43,423
Posts
935,317
Members
35,275
Latest member
OurDually
Top